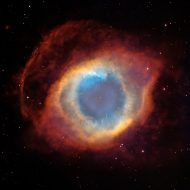
I have now captured every single planet in our solar system, except the one we are standing on. I feel I have squeezed as much resolution out of my tiny scope as possible. Finally can sell the 150mm f5 reflector with a horrible flimsy focuser, get a larger scope and start from scratch – getting a bit closer with more detail
Most planets were imaged a few years ago with only Mercury and Neptune left. On November 8-9, 2020, I was able to capture both – Neptune in the evening and Mercury in the morning.
From left: Mercury, Venus, Mars, Jupiter, Saturn, Uranus, Neptune
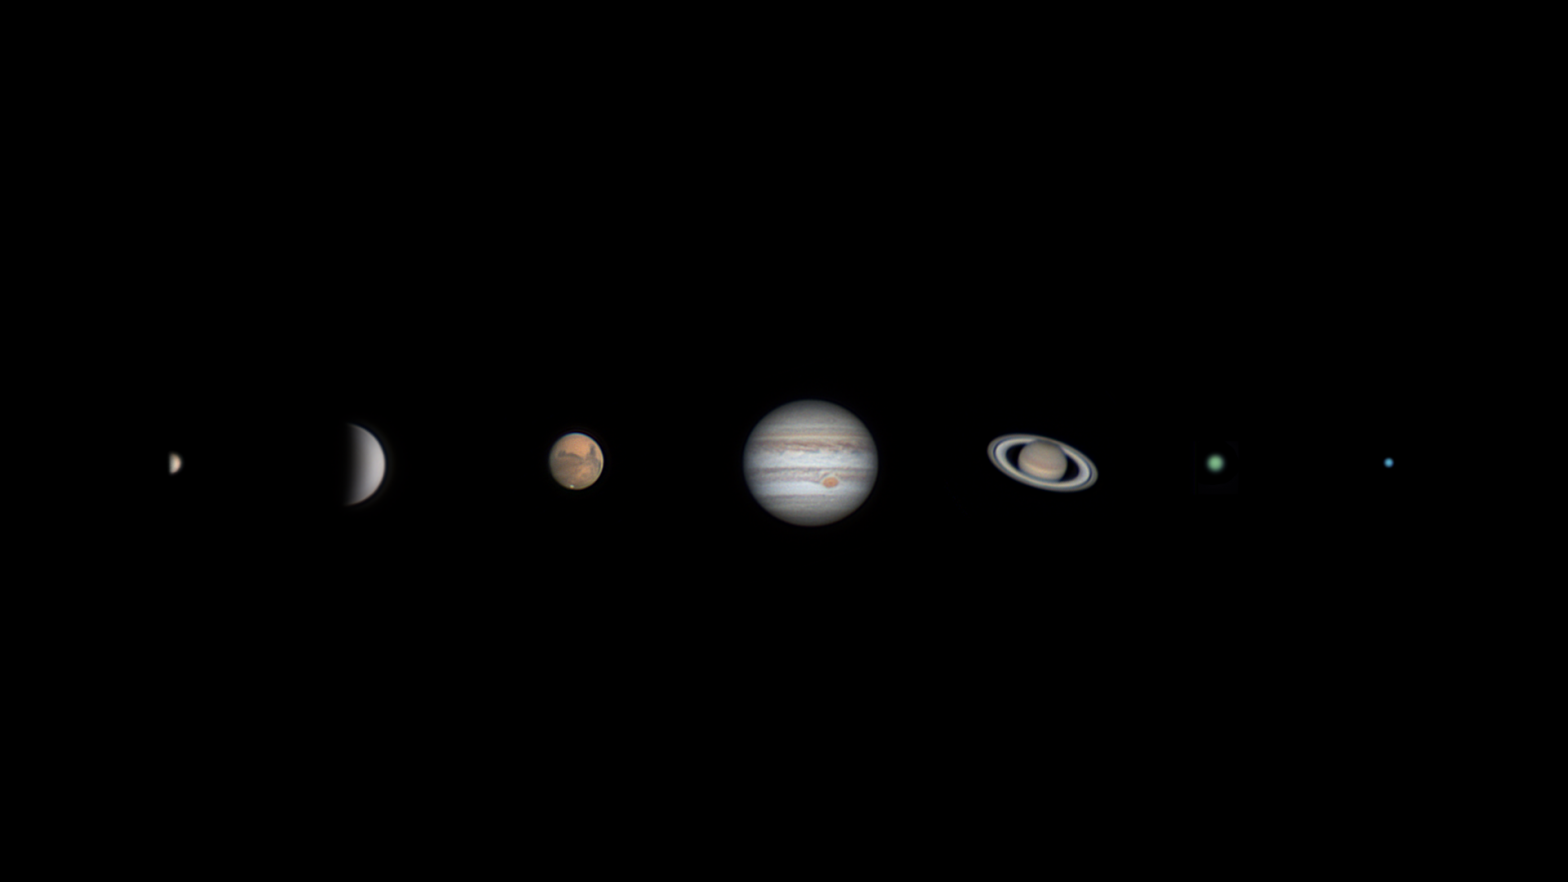
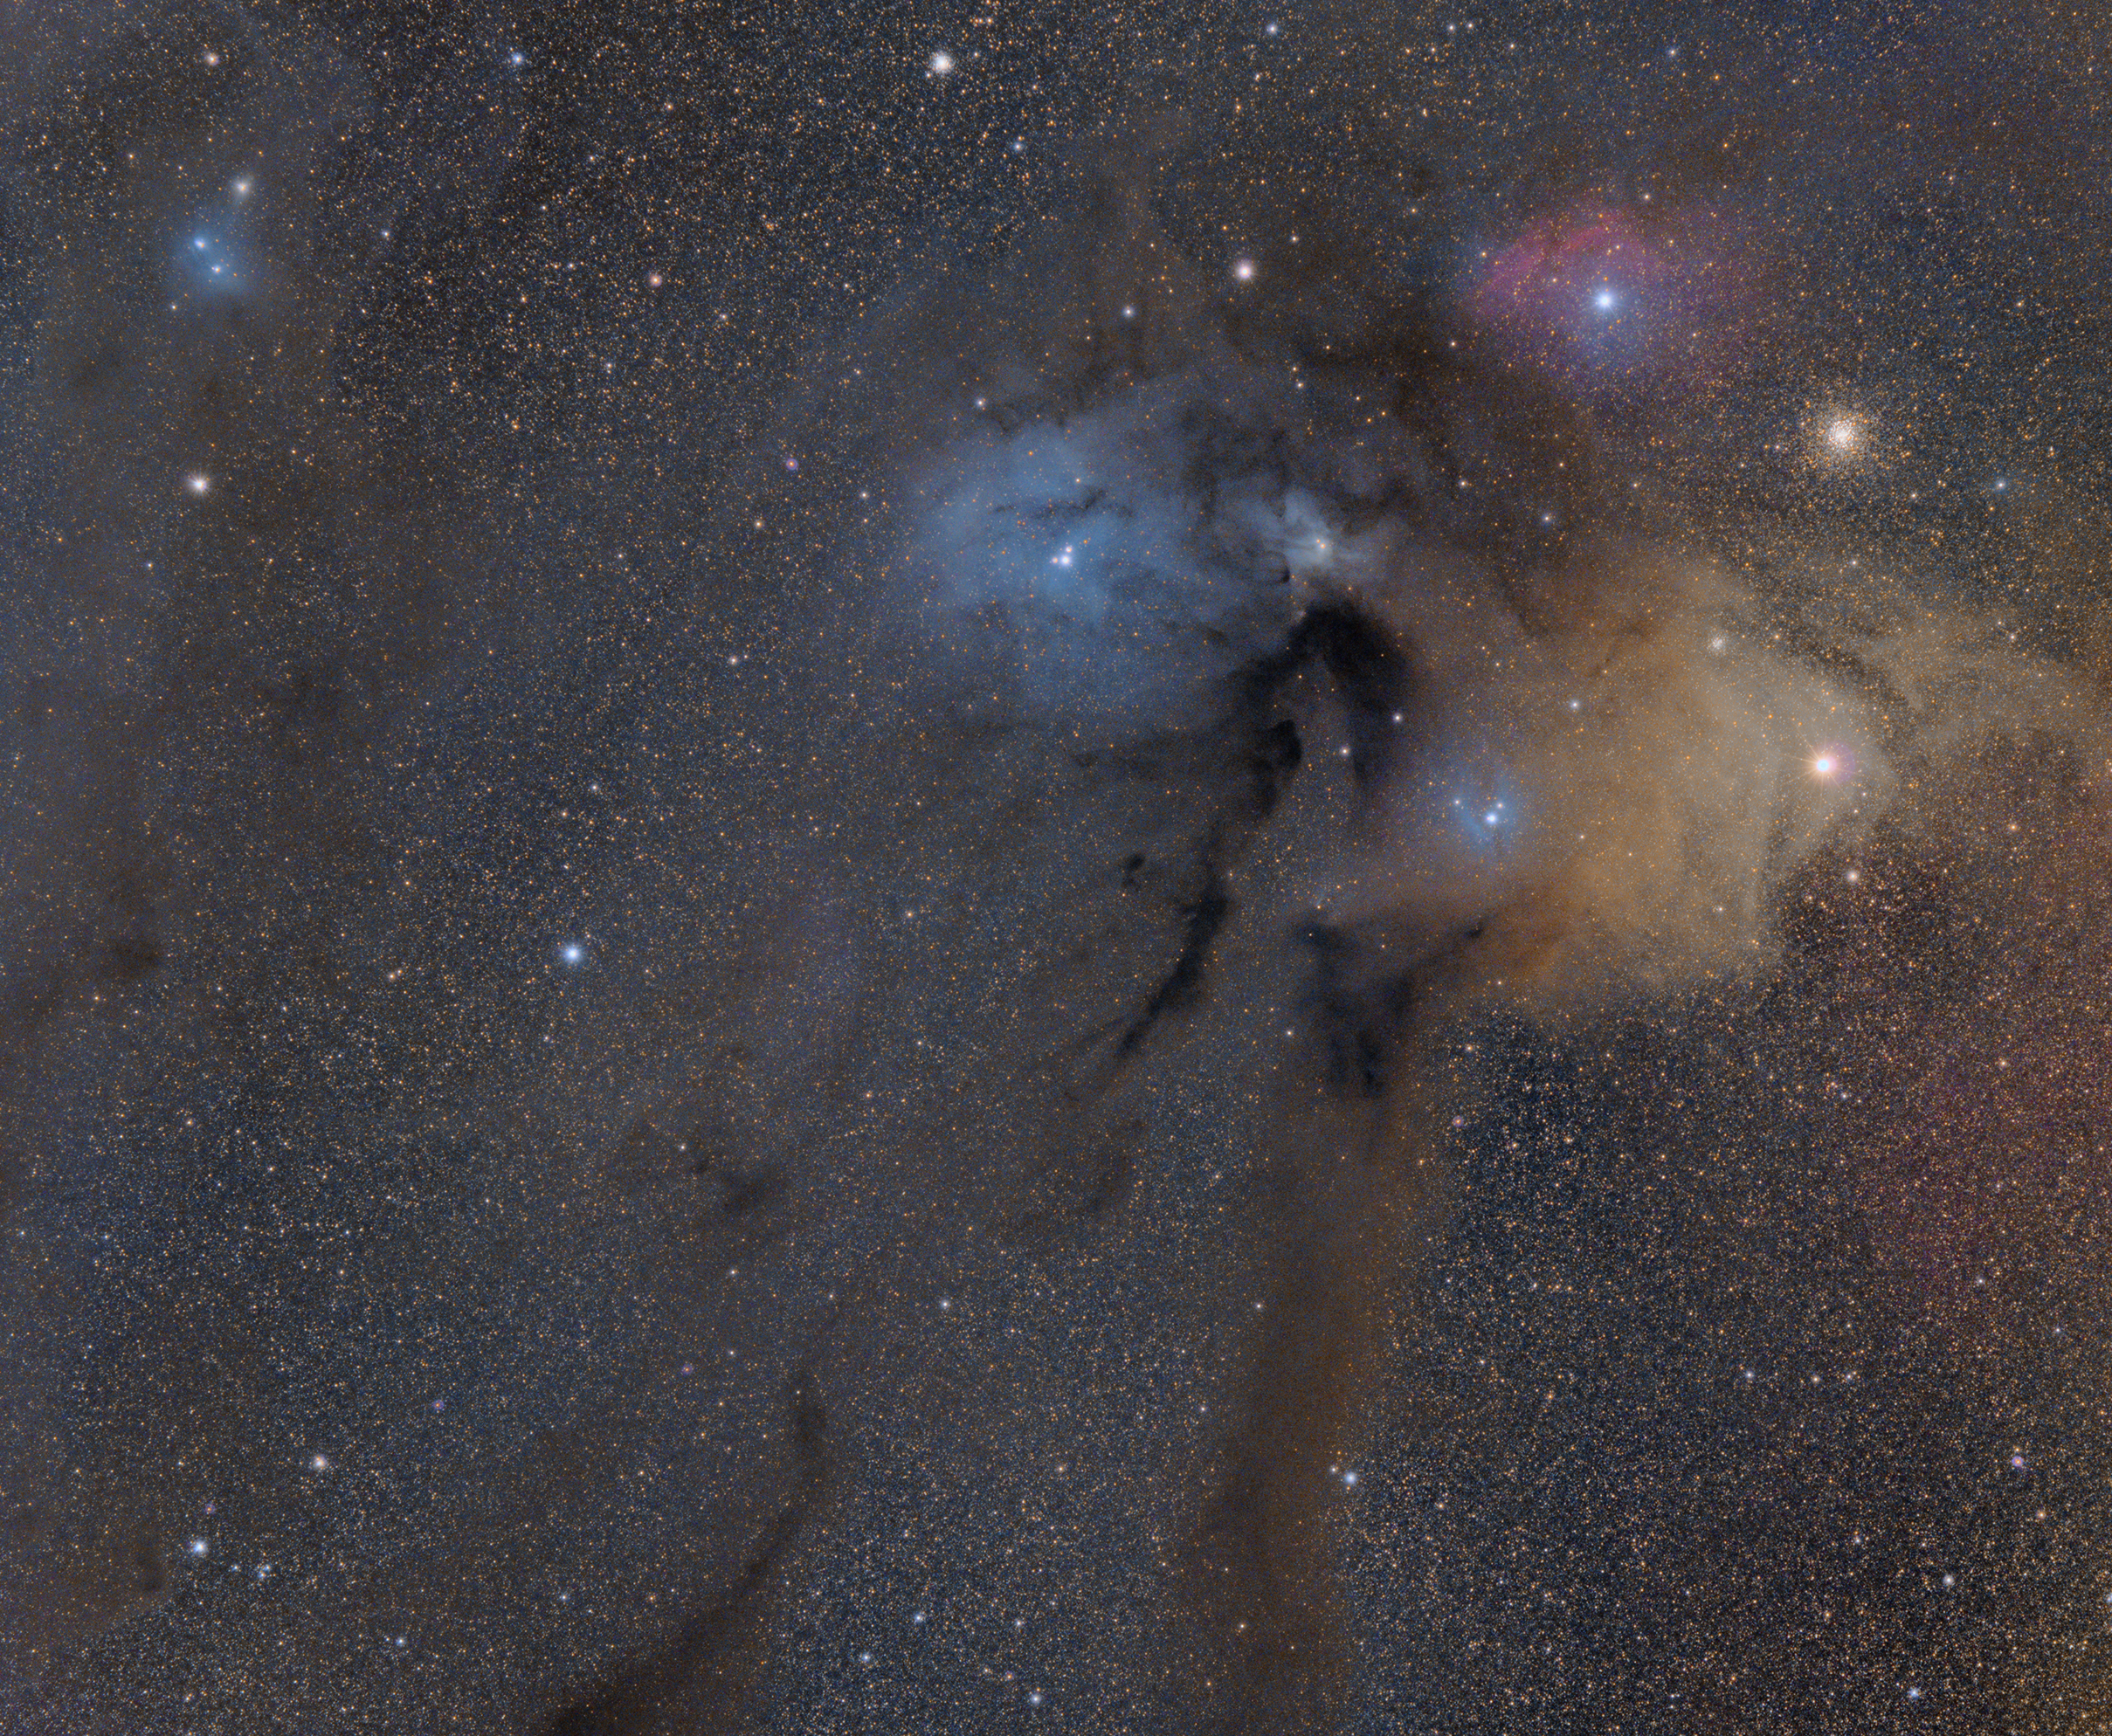
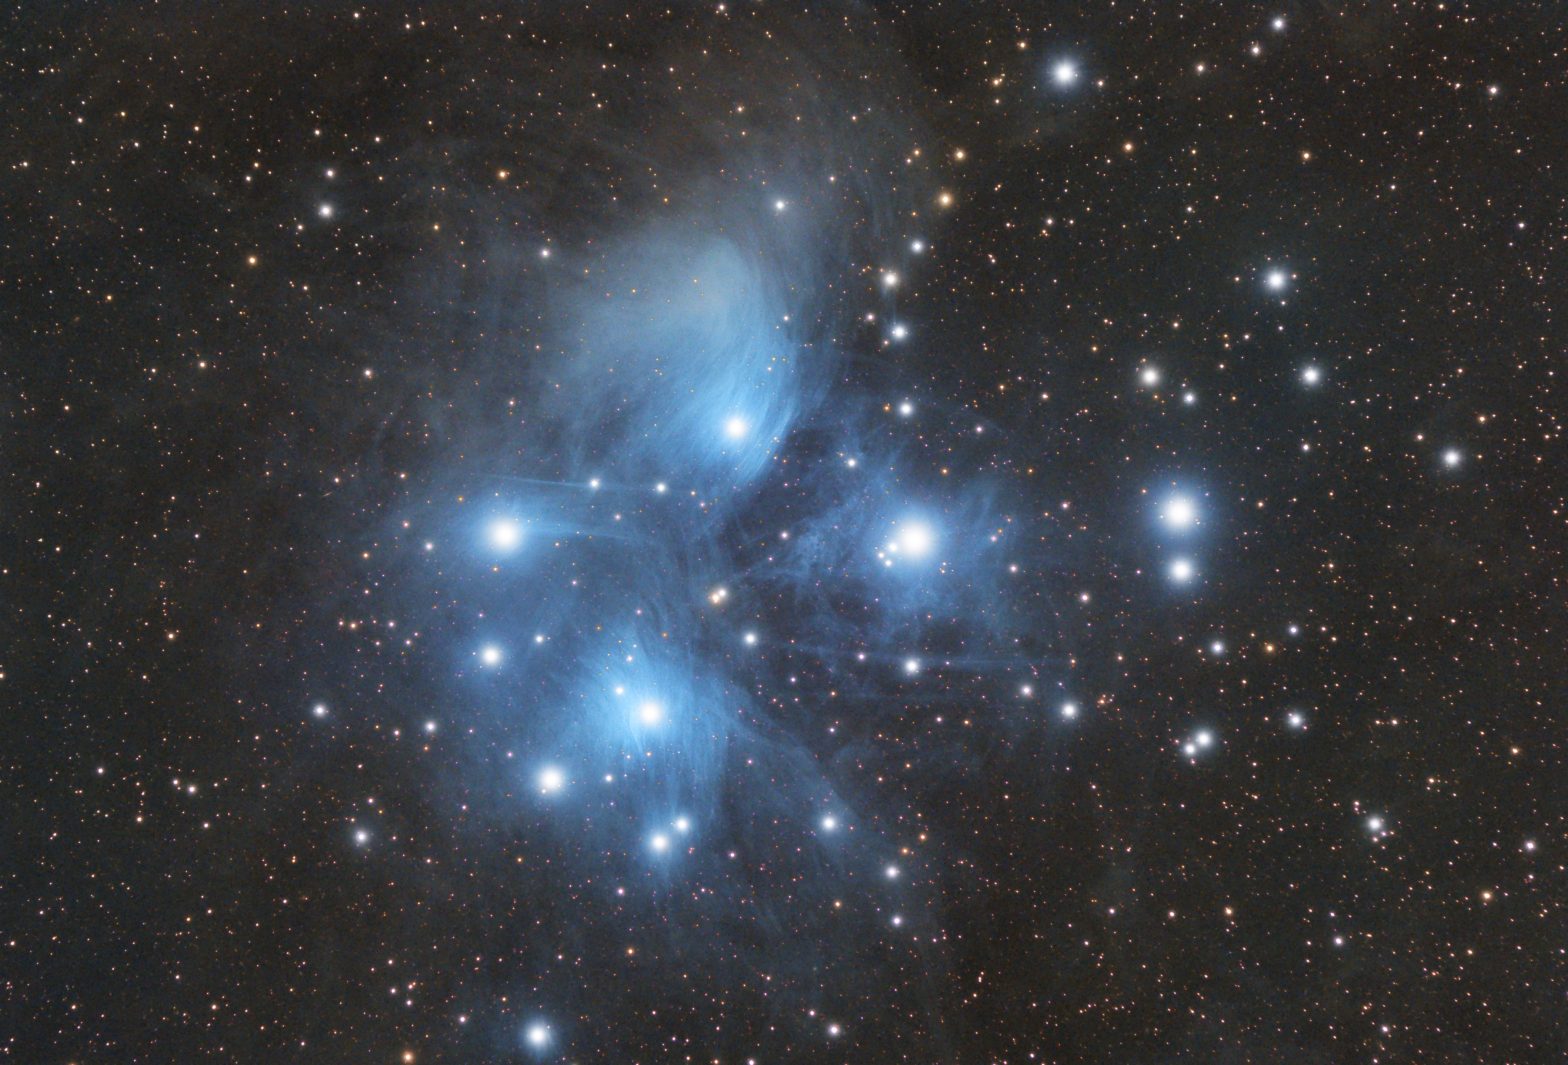
The main reason for purchasing the Rokinon 135mm was a quest to shoot Rho Ophiuchi, an object I wanted to shoot for a long time. It stands out for its multiple bright colours, vivid dust lanes and even has a star cluster. After learning about it some time ago, I realized it was too big to fit into the field of view of my ED80. But at 135mm, it fit perfectly into D5300’s crop sensor. When the lens arrived, I quickly realized that due to its weight, there was no chance of attaching it to the guide scope without some support. A clear night was quickly approaching, and I didn’t have the time to order proper mounting rings for it. So I put together a support for the lens made out of balsa wood and wound heavy-duty twist tie to keep it snugly in place. Finally, I set out to a Bortle 3 location to try my luck.
Quick and dirty attachment of Rokinon lens to mount
From Ontario, Rho Ophiuchi is very low in the sky and the window to shoot is short. I started imaging at midnight and by 1am, the star complex was getting too low and approaching light pollution at the horizon. I ended up taking 23 images. Fast forward a year later and I finally got around to processing this.
You begin any processing with a set of images from your session. Each image contains a bit of signal (the good part) and a bit of noise and light pollution.
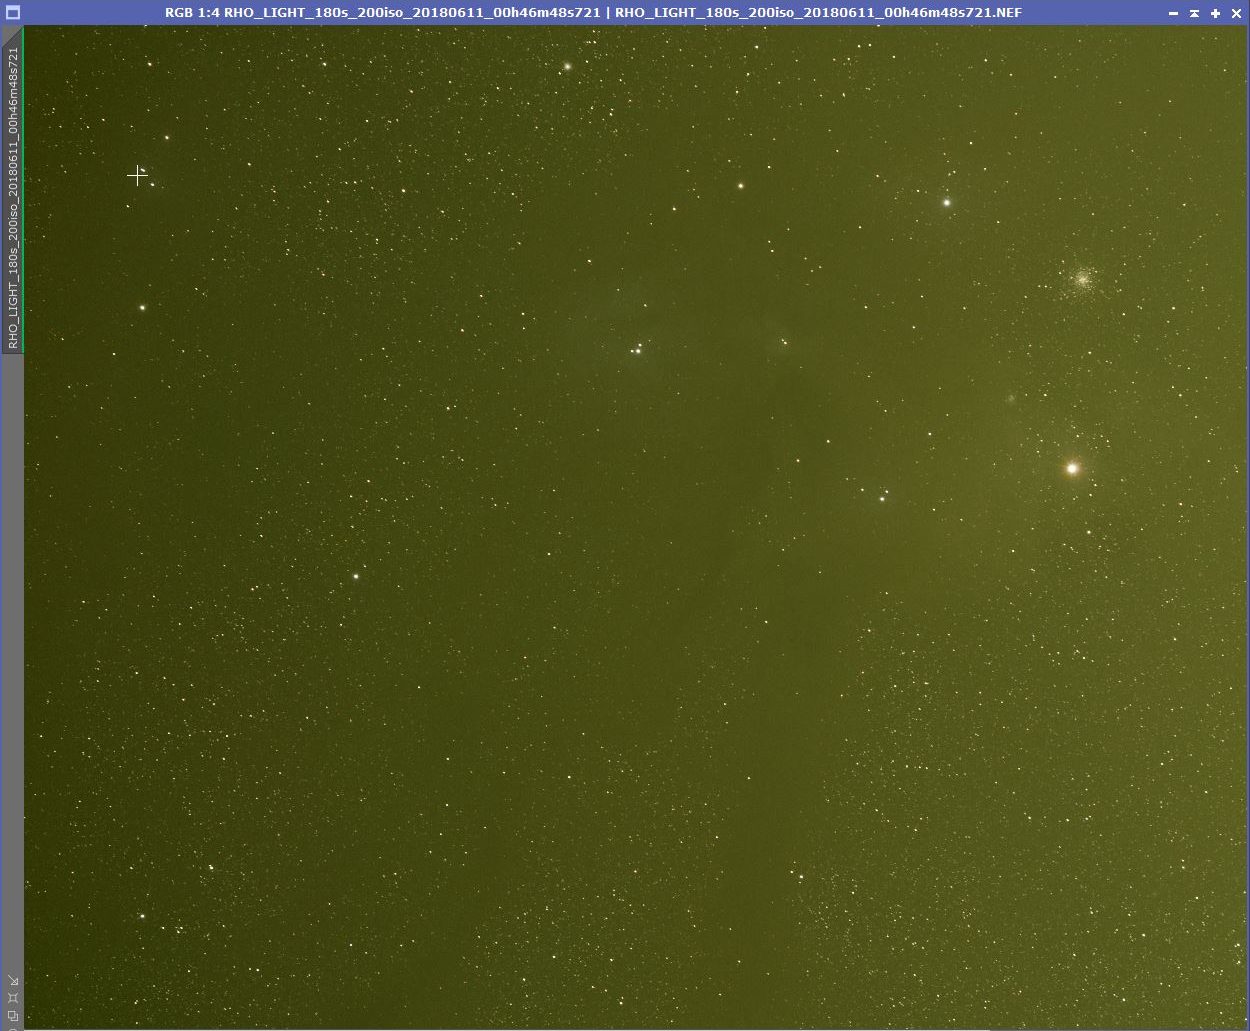
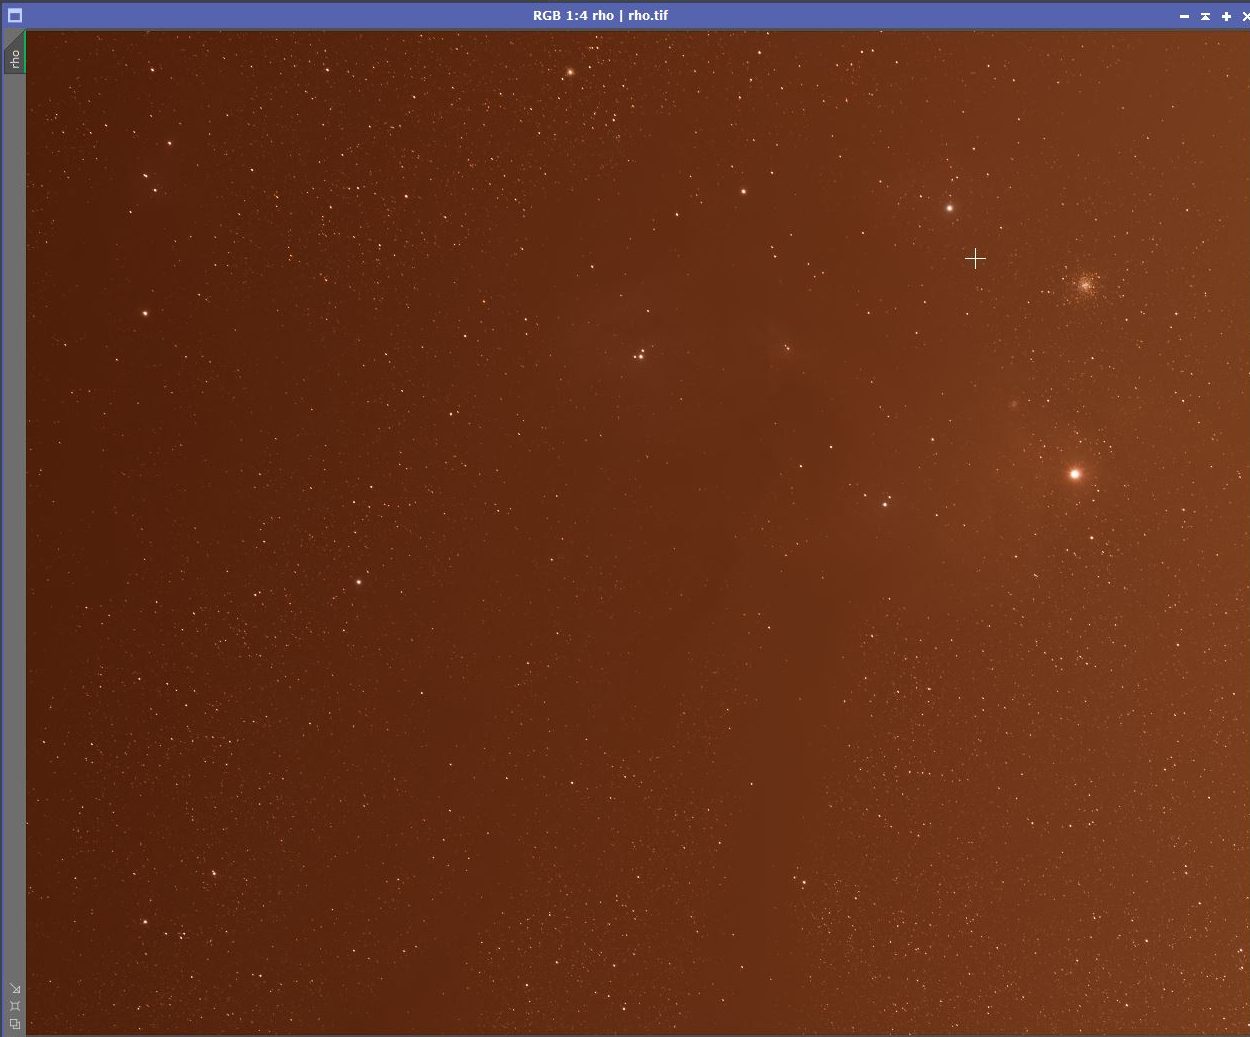
A single 3 minute sub from a Bortle 3 site
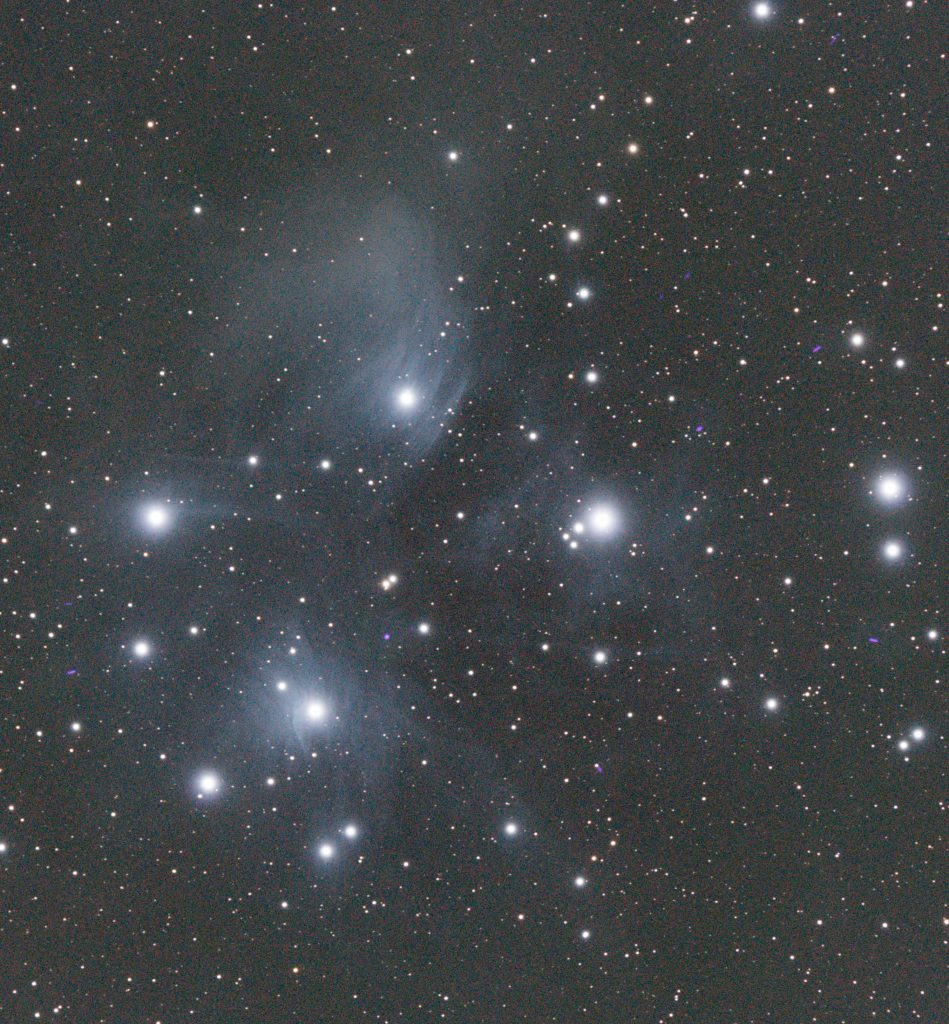
Now its time to stack your frames to increase the SNR (signal to noise ratio). Because there is light pollution in the subs (individual images), you inherently also stack or add up the light pollution also. In result, your improved signal is hidden behind a thicker layer of light pollution that turns the photo to this:
23 3-minute subs are stacked to produce this image
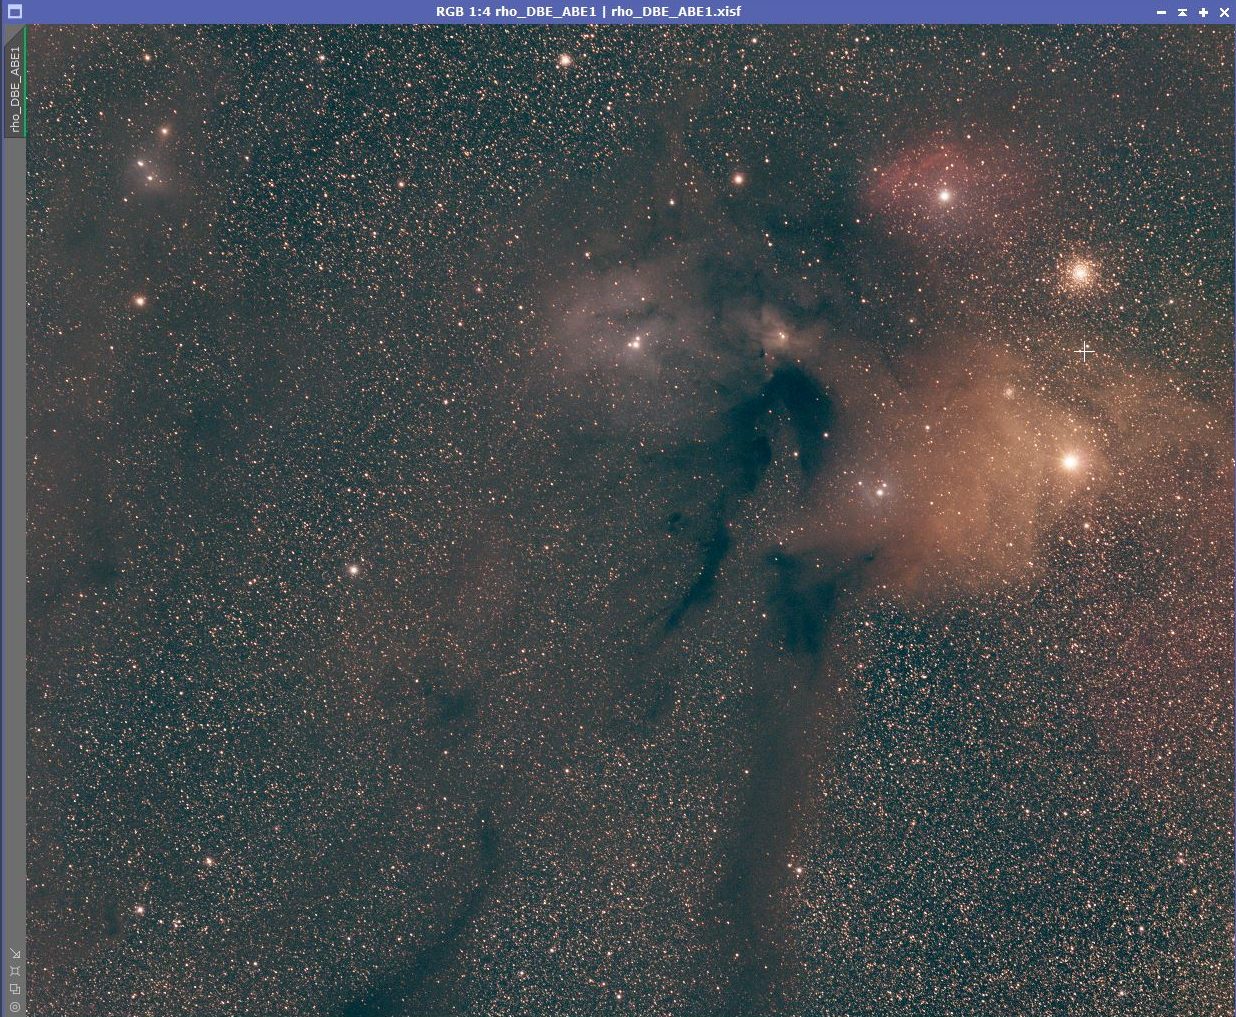
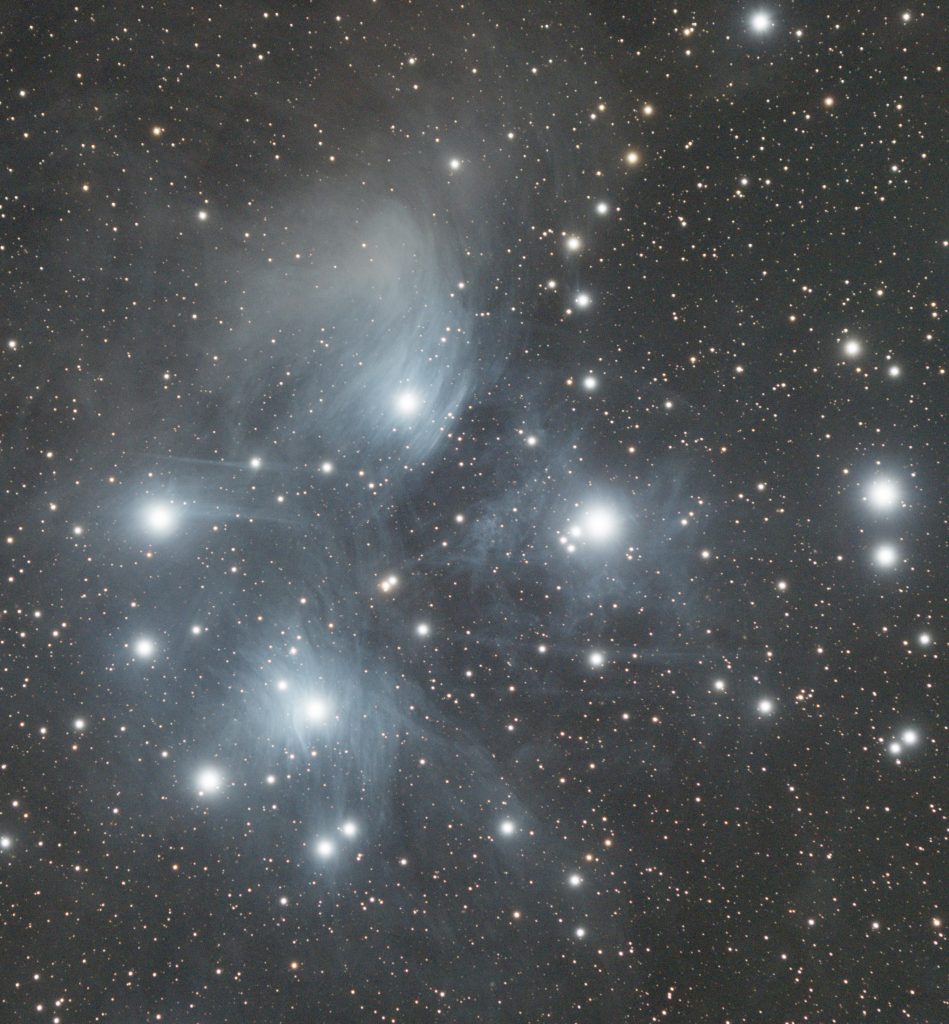
Your next task is to remove the light pollution. As light pollution is never evenly spread across the sky, it becomes a challenge to remove this unwanted gradient. Luckily Pixinsight has a great tool for this called DBE (DynamicBackgroundExtraction). After some tinkering with its settings, I subtract the pollution gradient from the image, and you finally begin to see the object, with its signal amplified by the stacking process.
Light pollution gradient removed using DBE in Pixinsight
At this stage, there is still a lot of work left, but seeing your deep space object gives you a drive to move forward. After some color balance and stretching the image to a non-linear state, you arrive closer to the finished product.
Color calibrated and stretched image
The final steps are to do some noise reduction on the grainy parts, increase sharpening, contrast, and saturation to bring out the color. All these steps require careful masks in order to not apply these affects to the whole image, but only the parts you want improved. Finally, a small star reduction to bring out the object more to the foreground, and we finally have a complete astrophotography image.
Final image of Rho Ophiuchi
GEAR USED
Rokinon 135mm f2 D5300 Ha modded AVX mount ST80/QHY5L-II quiding Sharpcap alignment
Dynamic crop DBE Background Neutralization Color Calibration Histogram Transformation Local Histogram Equalization Multiscale Linear Transform Curves SCNR Green Dark structure enhance Morphological transformation for star reduction
Unbelievable. Shooting with a fast lens is so fulfilling. With one short session, Im able to collect enormous amount of data at f2.8. In addition, the 135mm FOV allows me to capture a wide swath of sky.
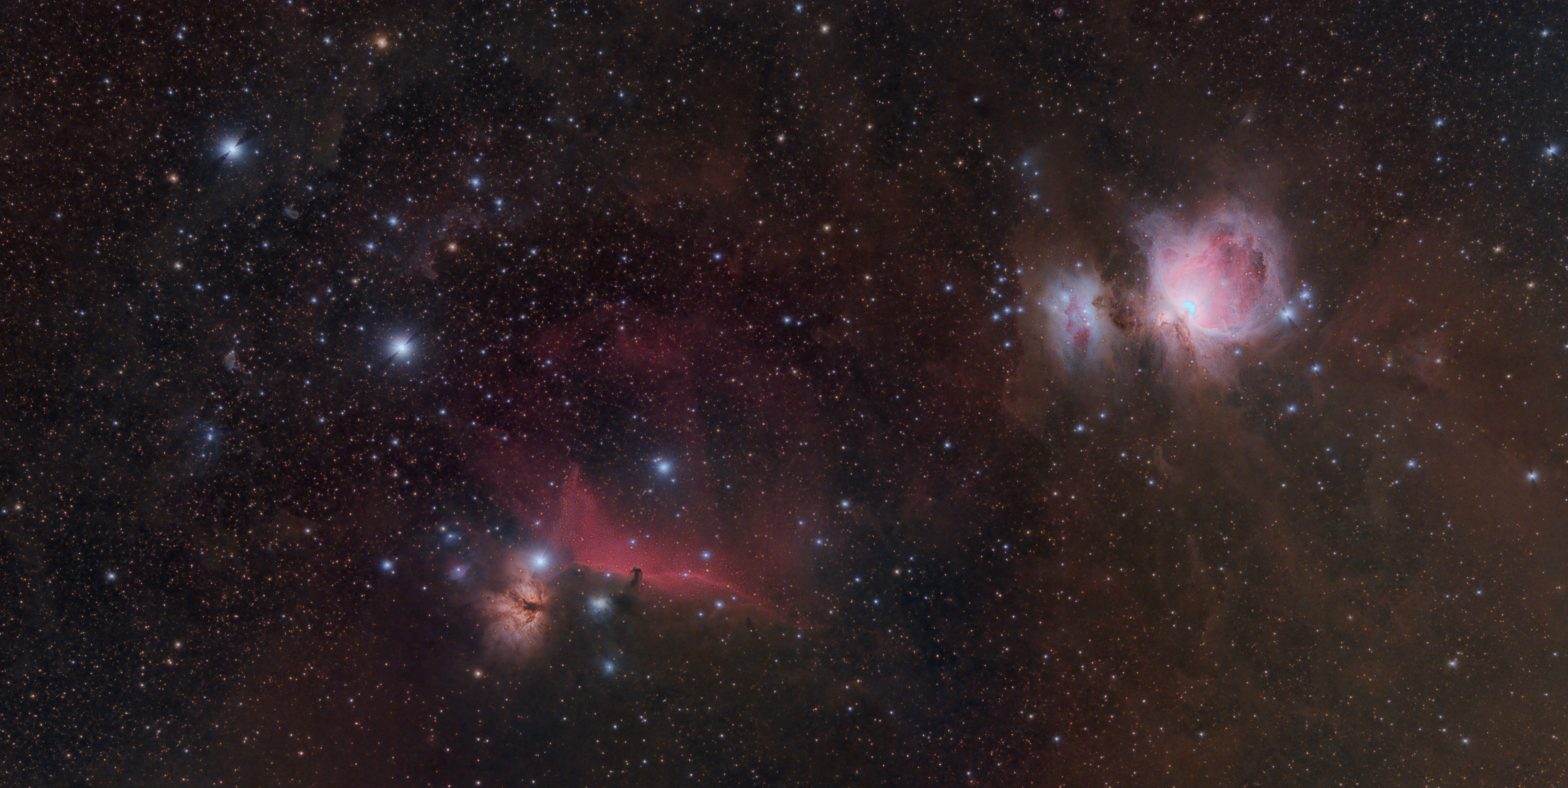
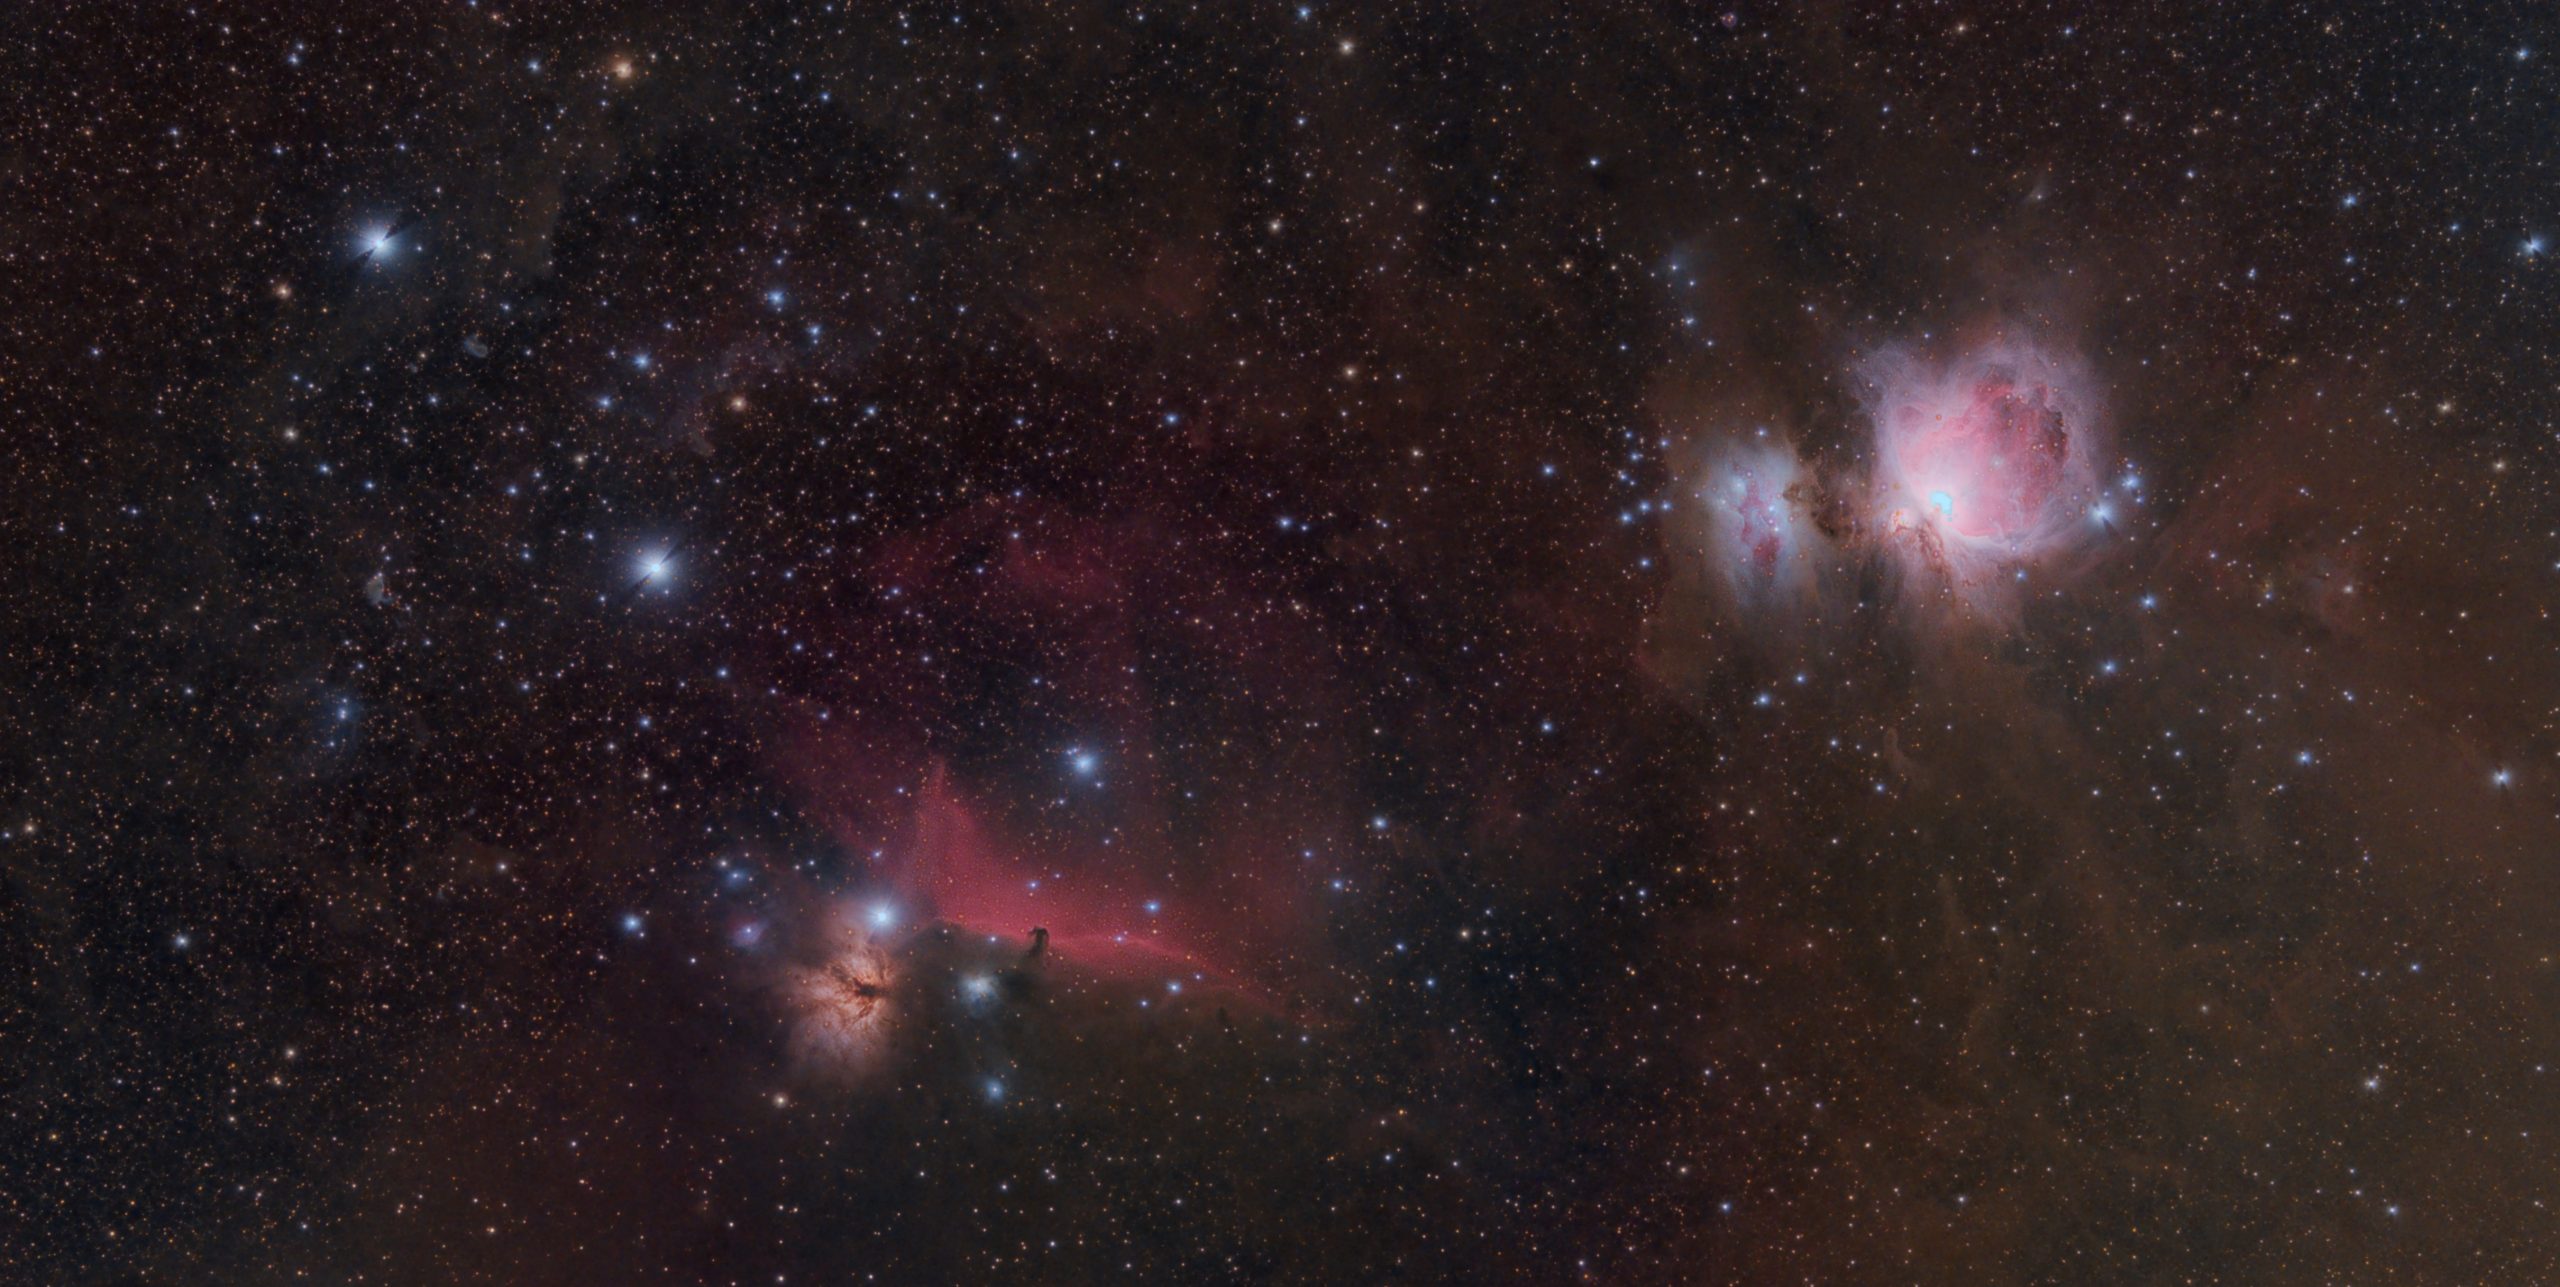
When pointing to Orion, I was able to capture the Horsehead Nebula, Orion Nebula, The Running Man Nebula, M78 and Barnards Loop – all in one capture. With my 80mm telescope, I could only cover one of these objects at a time.
This image was 2 years in the making. I shot it originally in January of 2018 but got around to processing it only now.
This is the full image taken at 135mm on Nikon D5300
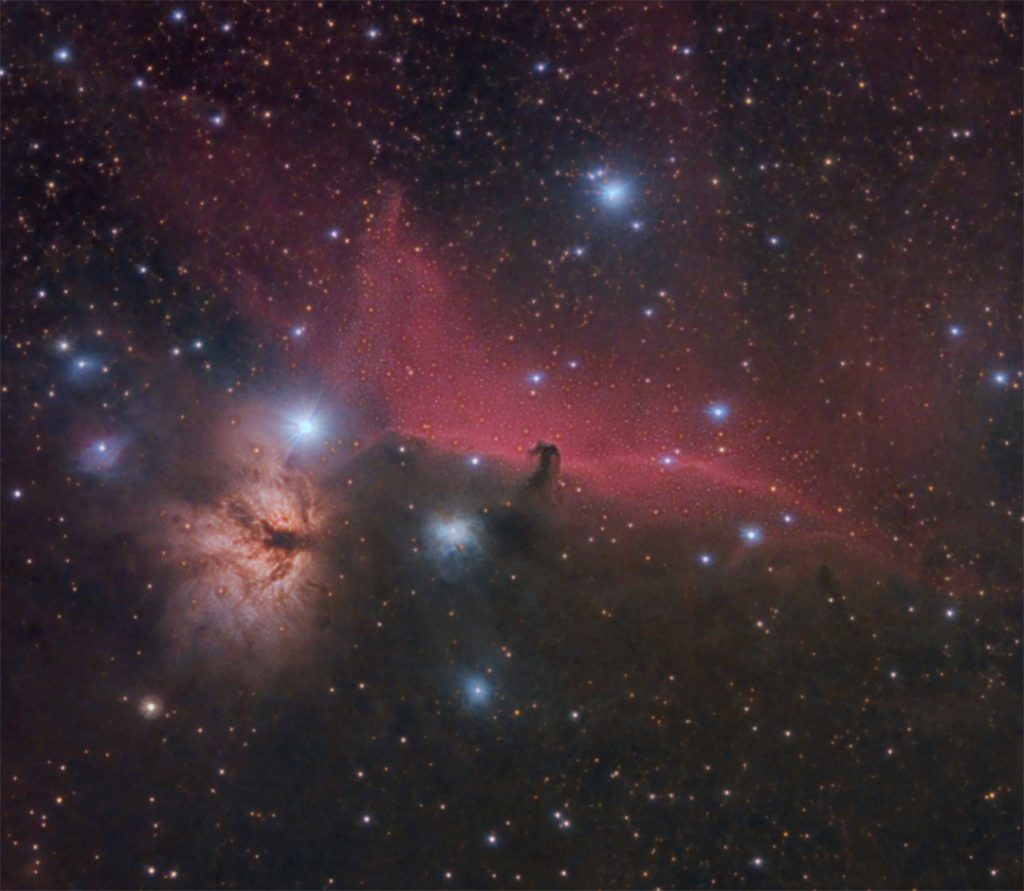
From this single high resolution image, we get a few very popular targets. Even though its heavily cropped, the quality and resolution is still presentable for images on the web. First we have the famous Horsehead and Flame nebulae:
NGC 2024 and IC434
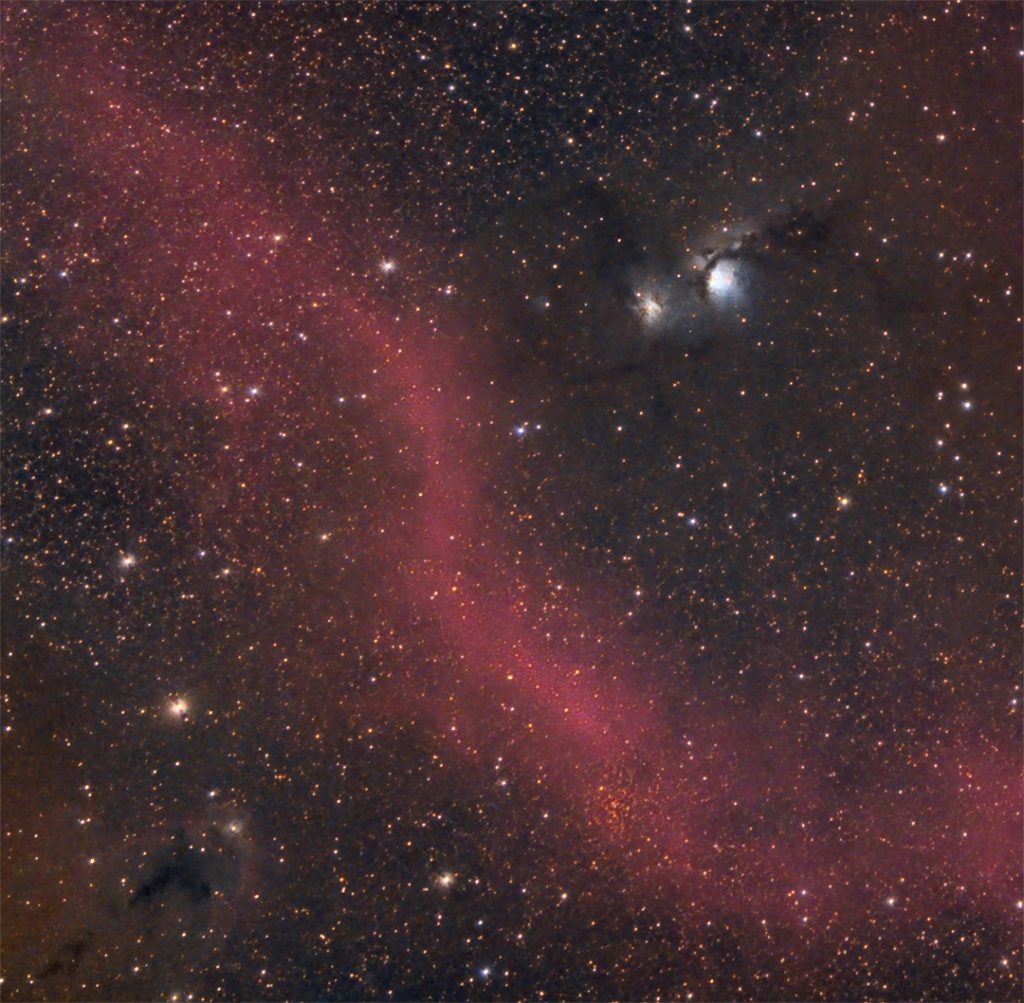
Barnards loop is an huge emission nebula that goes around Orion as a large arc. Above it is M78, a reflection nebula.
A bright portion of Barnard’s loop and M78
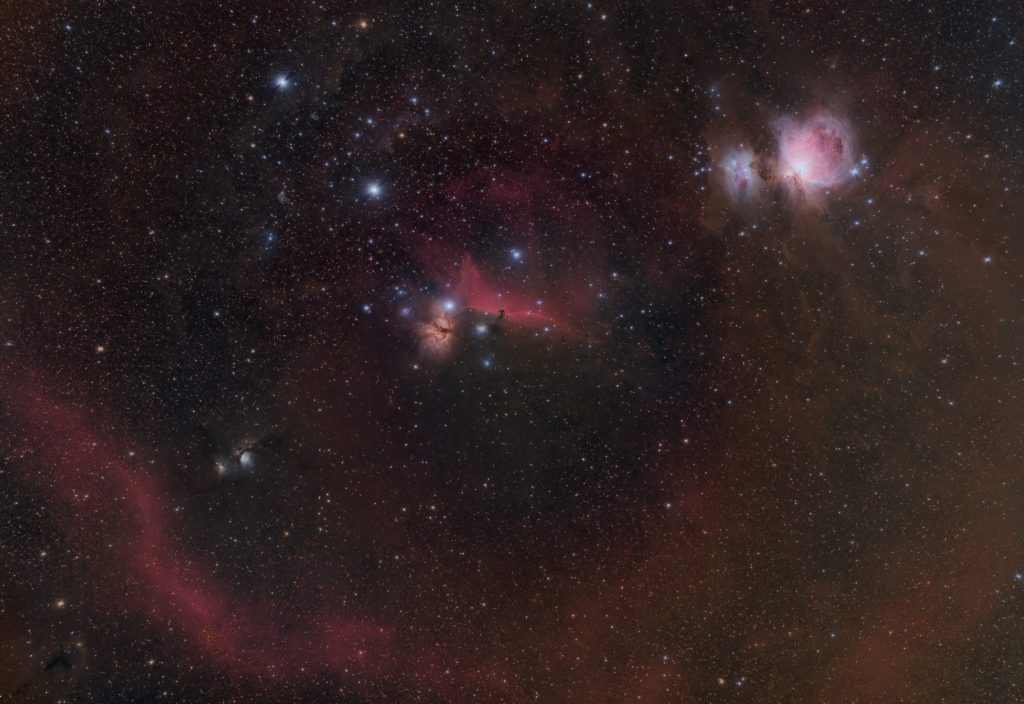
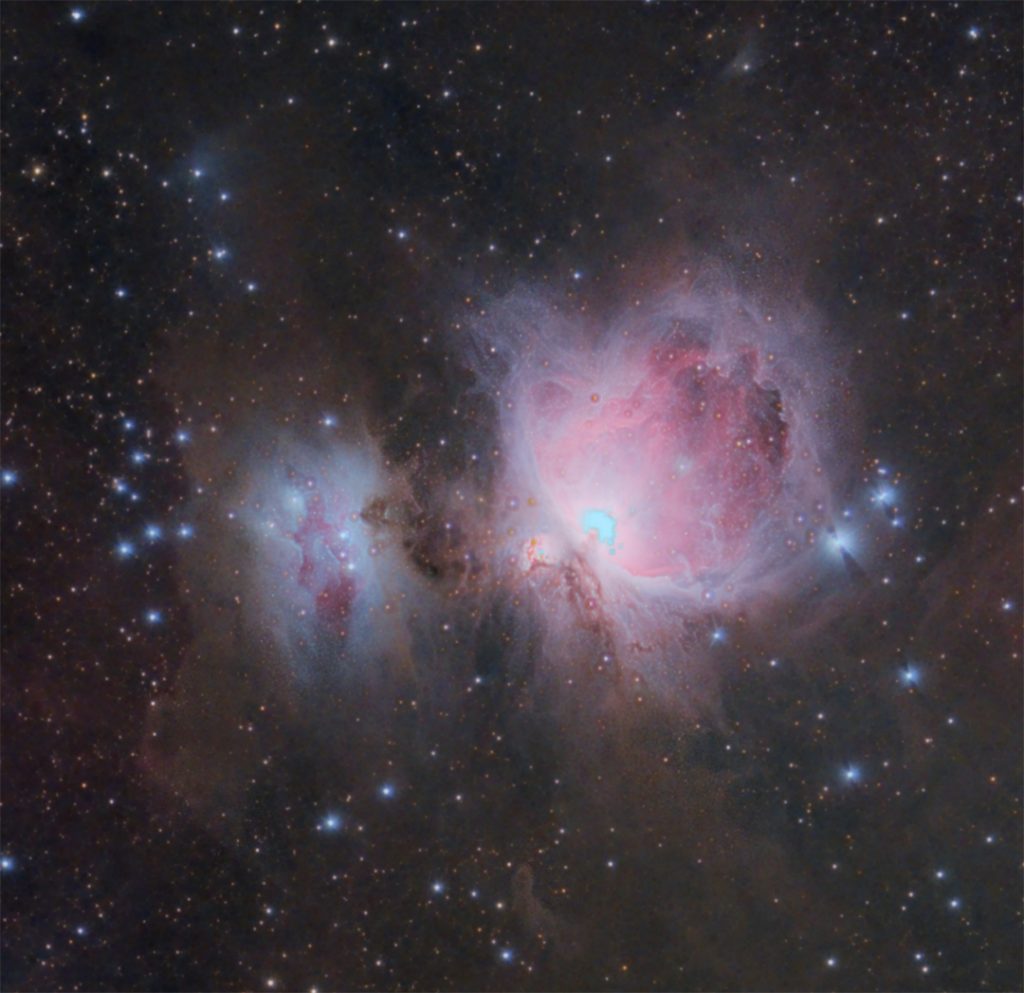
Last but not least, we have the famous Orion Nebula on the right and the Running Man nebula on the left.
Sh2-279 and M42
Finally, for my most favourite version of the bunch, I decided to center on the 3 bright stars of Orions Belt and include the two most prominent deep sky objects.
Orion Nebula Complex
GEAR USED
Rokinon 135mm f2.8 D5300 Ha modded AVX mount ST80/QHY5L-II quiding
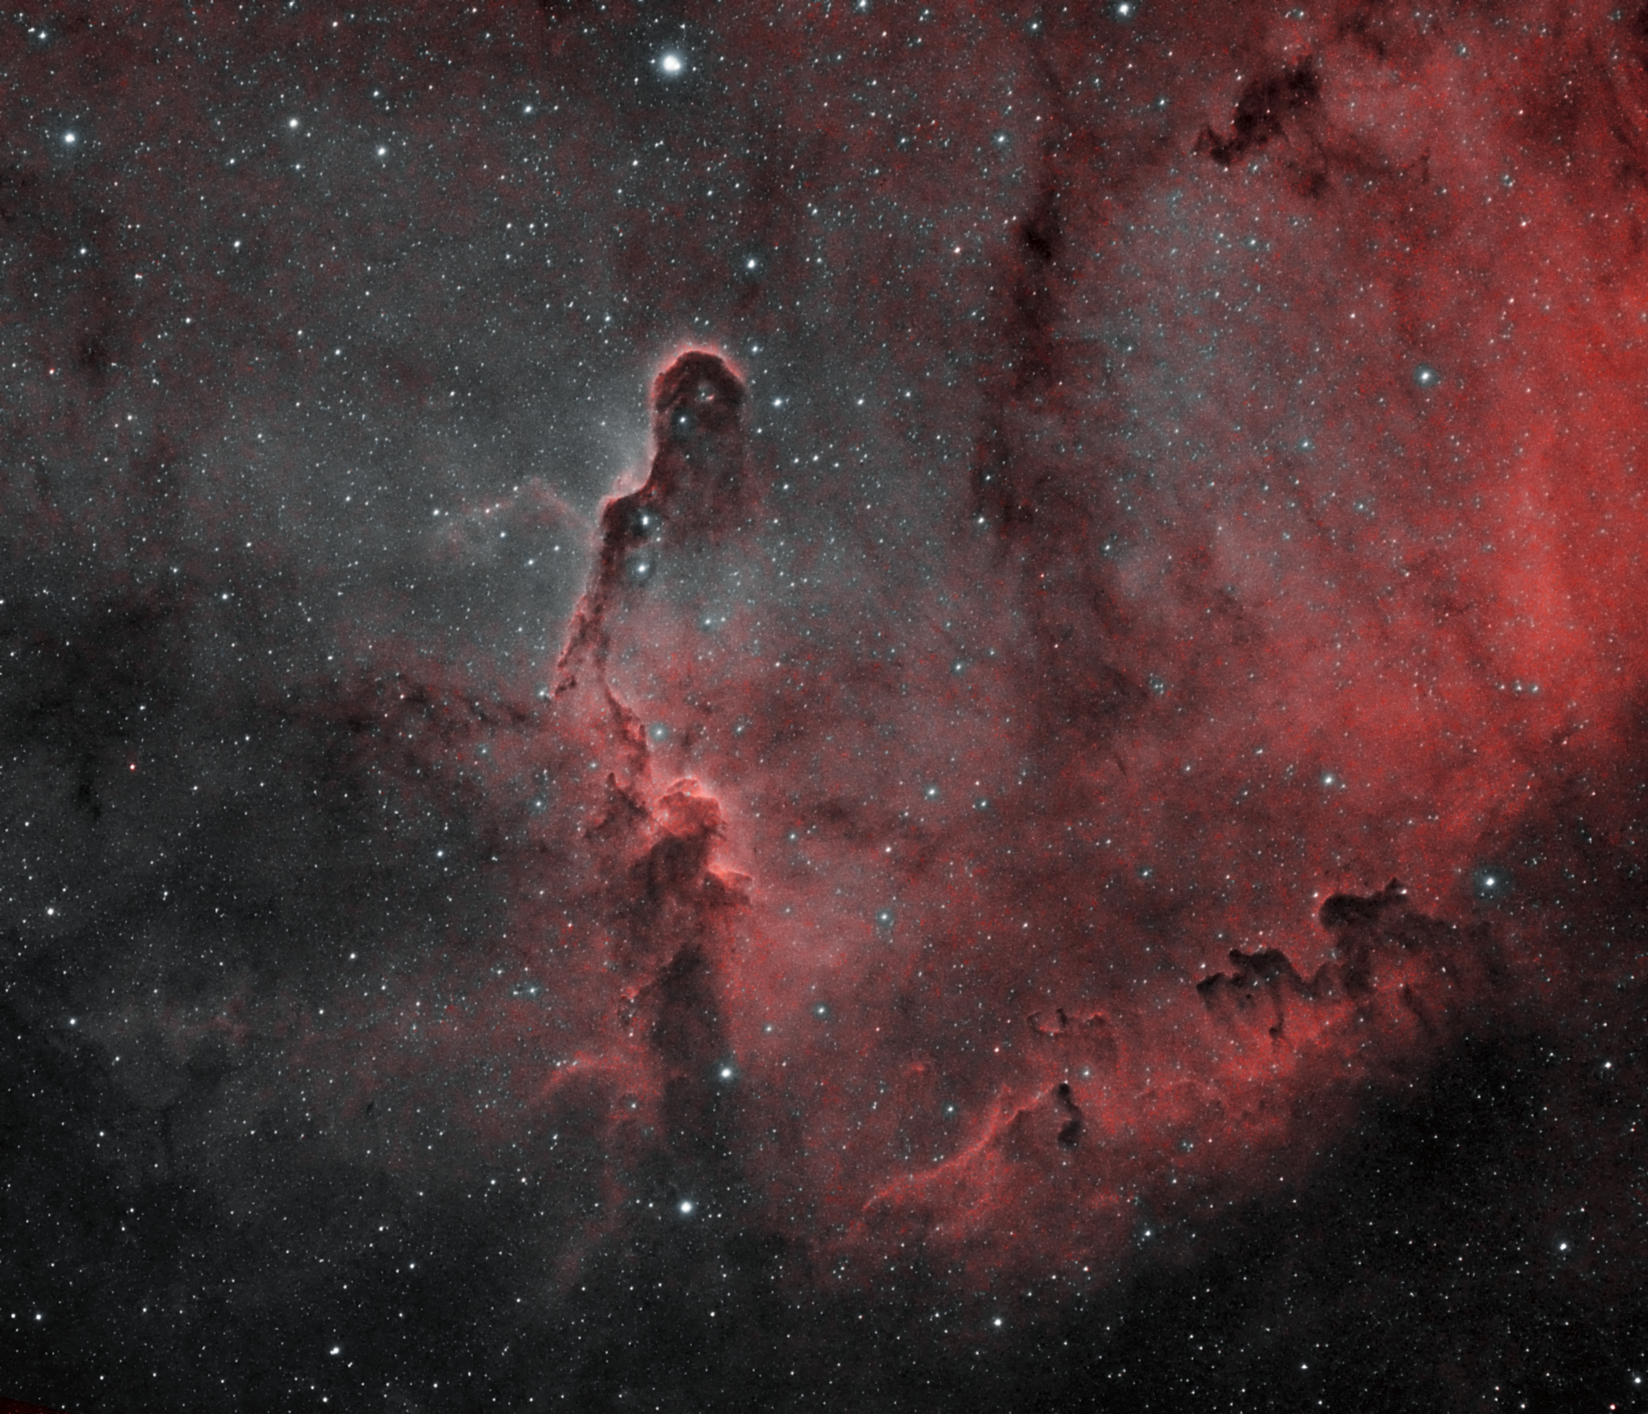
A bicolor narrowband DSLR image. With a Baader 2″ Ha 7nm and a Baader 2″ Oiii 8.5nm filters from Bortle 7-8 area of my home. 6 nights in total for 25 hours of exposure!
IC1396 using ED80 and D5300Ha – 25 hours exposure
GEAR USED
D5300 Ha modded AVX mount Orion ED80 with 0.85 reducer ST80/QHY224C quiding Sharpcap alignment
IMAGE ACQUISITION DETAILS
52 subs × 900s for Ha (dithered) 49 subs x 900s for Oiii (dithered) 25 flats for each 50 bias for each 12 darks for single Oiii session
TAKEN AT
Imaging session @ King City
IMAGE PROCESSING
DSS and Pixinsight
Stacked in DSS, processing in Pixinsight
Same steps for Ha and Oiii channels: – Debayered strong channel extracted – DBE – Deconvolution – MLT – Histogram transformation
Star alignment of Oiii with Ha image
LRGB Combine: L: Ha Red: Ha Green: Oiii Blue: Oiii
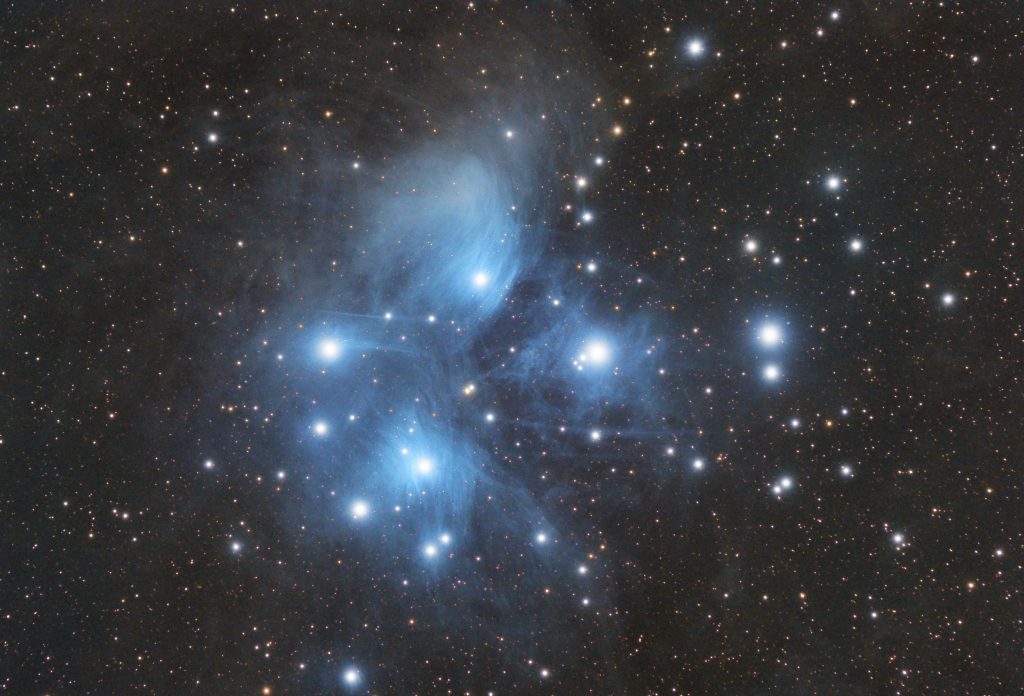
Last year, I travelled not far from Toronto to a Provincial Park called Forks of the Credit. It was very windy, and my guiding was horrible. In the end, I managed to only image 10 subs of M45. At the time, I did not dither, and was not using any flat frames. This year I decided to take it up a notch, and travel further north, to a Bortle 3 area. This time armed with a D5300 (less noise), and better calibration frame techniques, I snapped up 35 subs of Pleiades. I also had my friend’s company, who came along for the 2 hour ride.
The results speak for them selves. The two photos below are the results of each session’s stack. The images are not processed for this demonstration, only the light pollution gradient is removed using ABE in Pixinsight. Notice how much more nebulosity and SNR the right image has. Although I am not too happy with the star bloat on the D5300. I think it is caused by the Ha modification, which doesn’t cut off the red spectrum as much. A reflection nebula such as this might benefit from using an IR filter in the future.
First attempt on September 21, 2017
Forks of the Credit (Bortle 4) – D3200 – 10 subs @ 4min
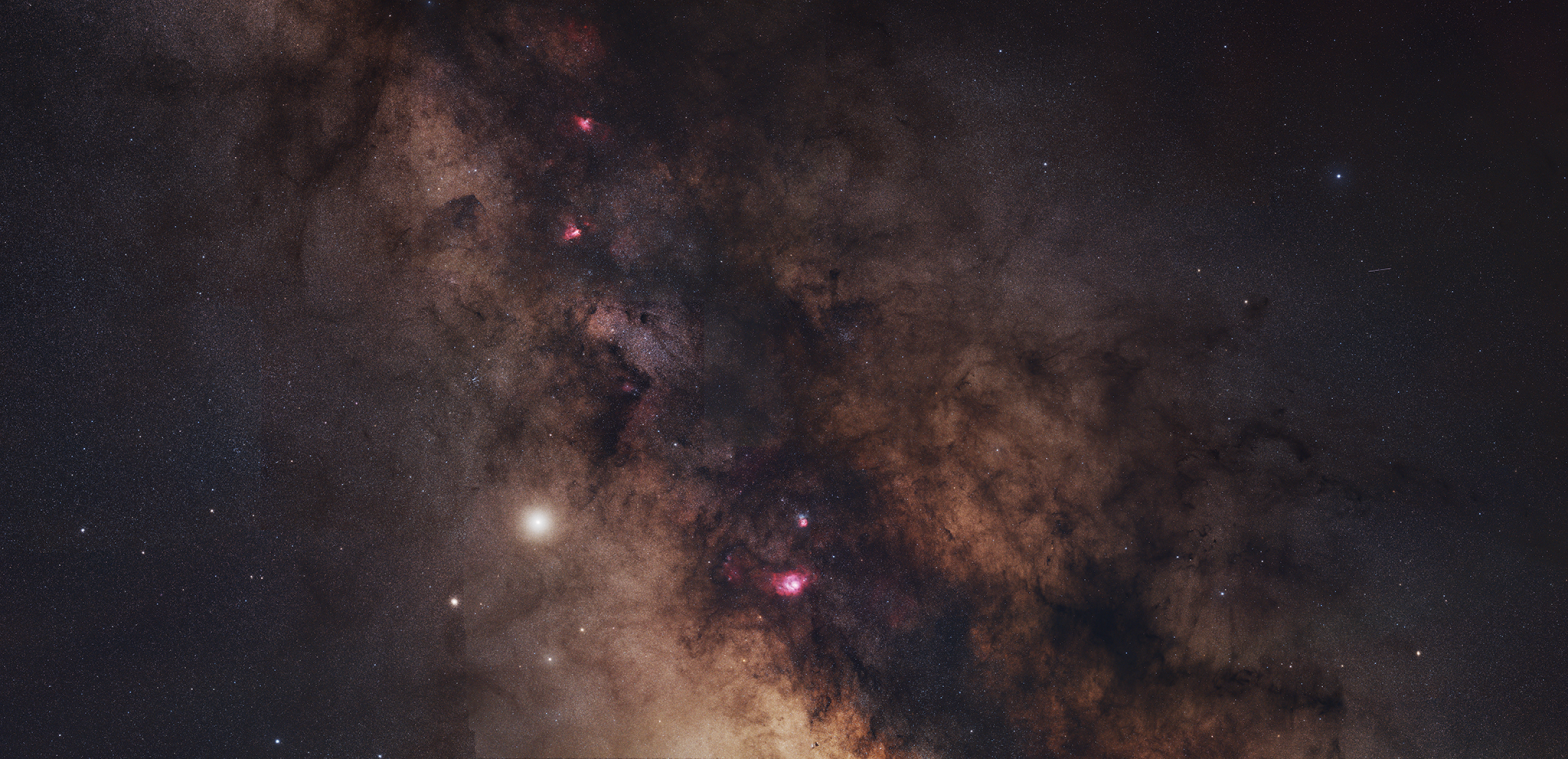
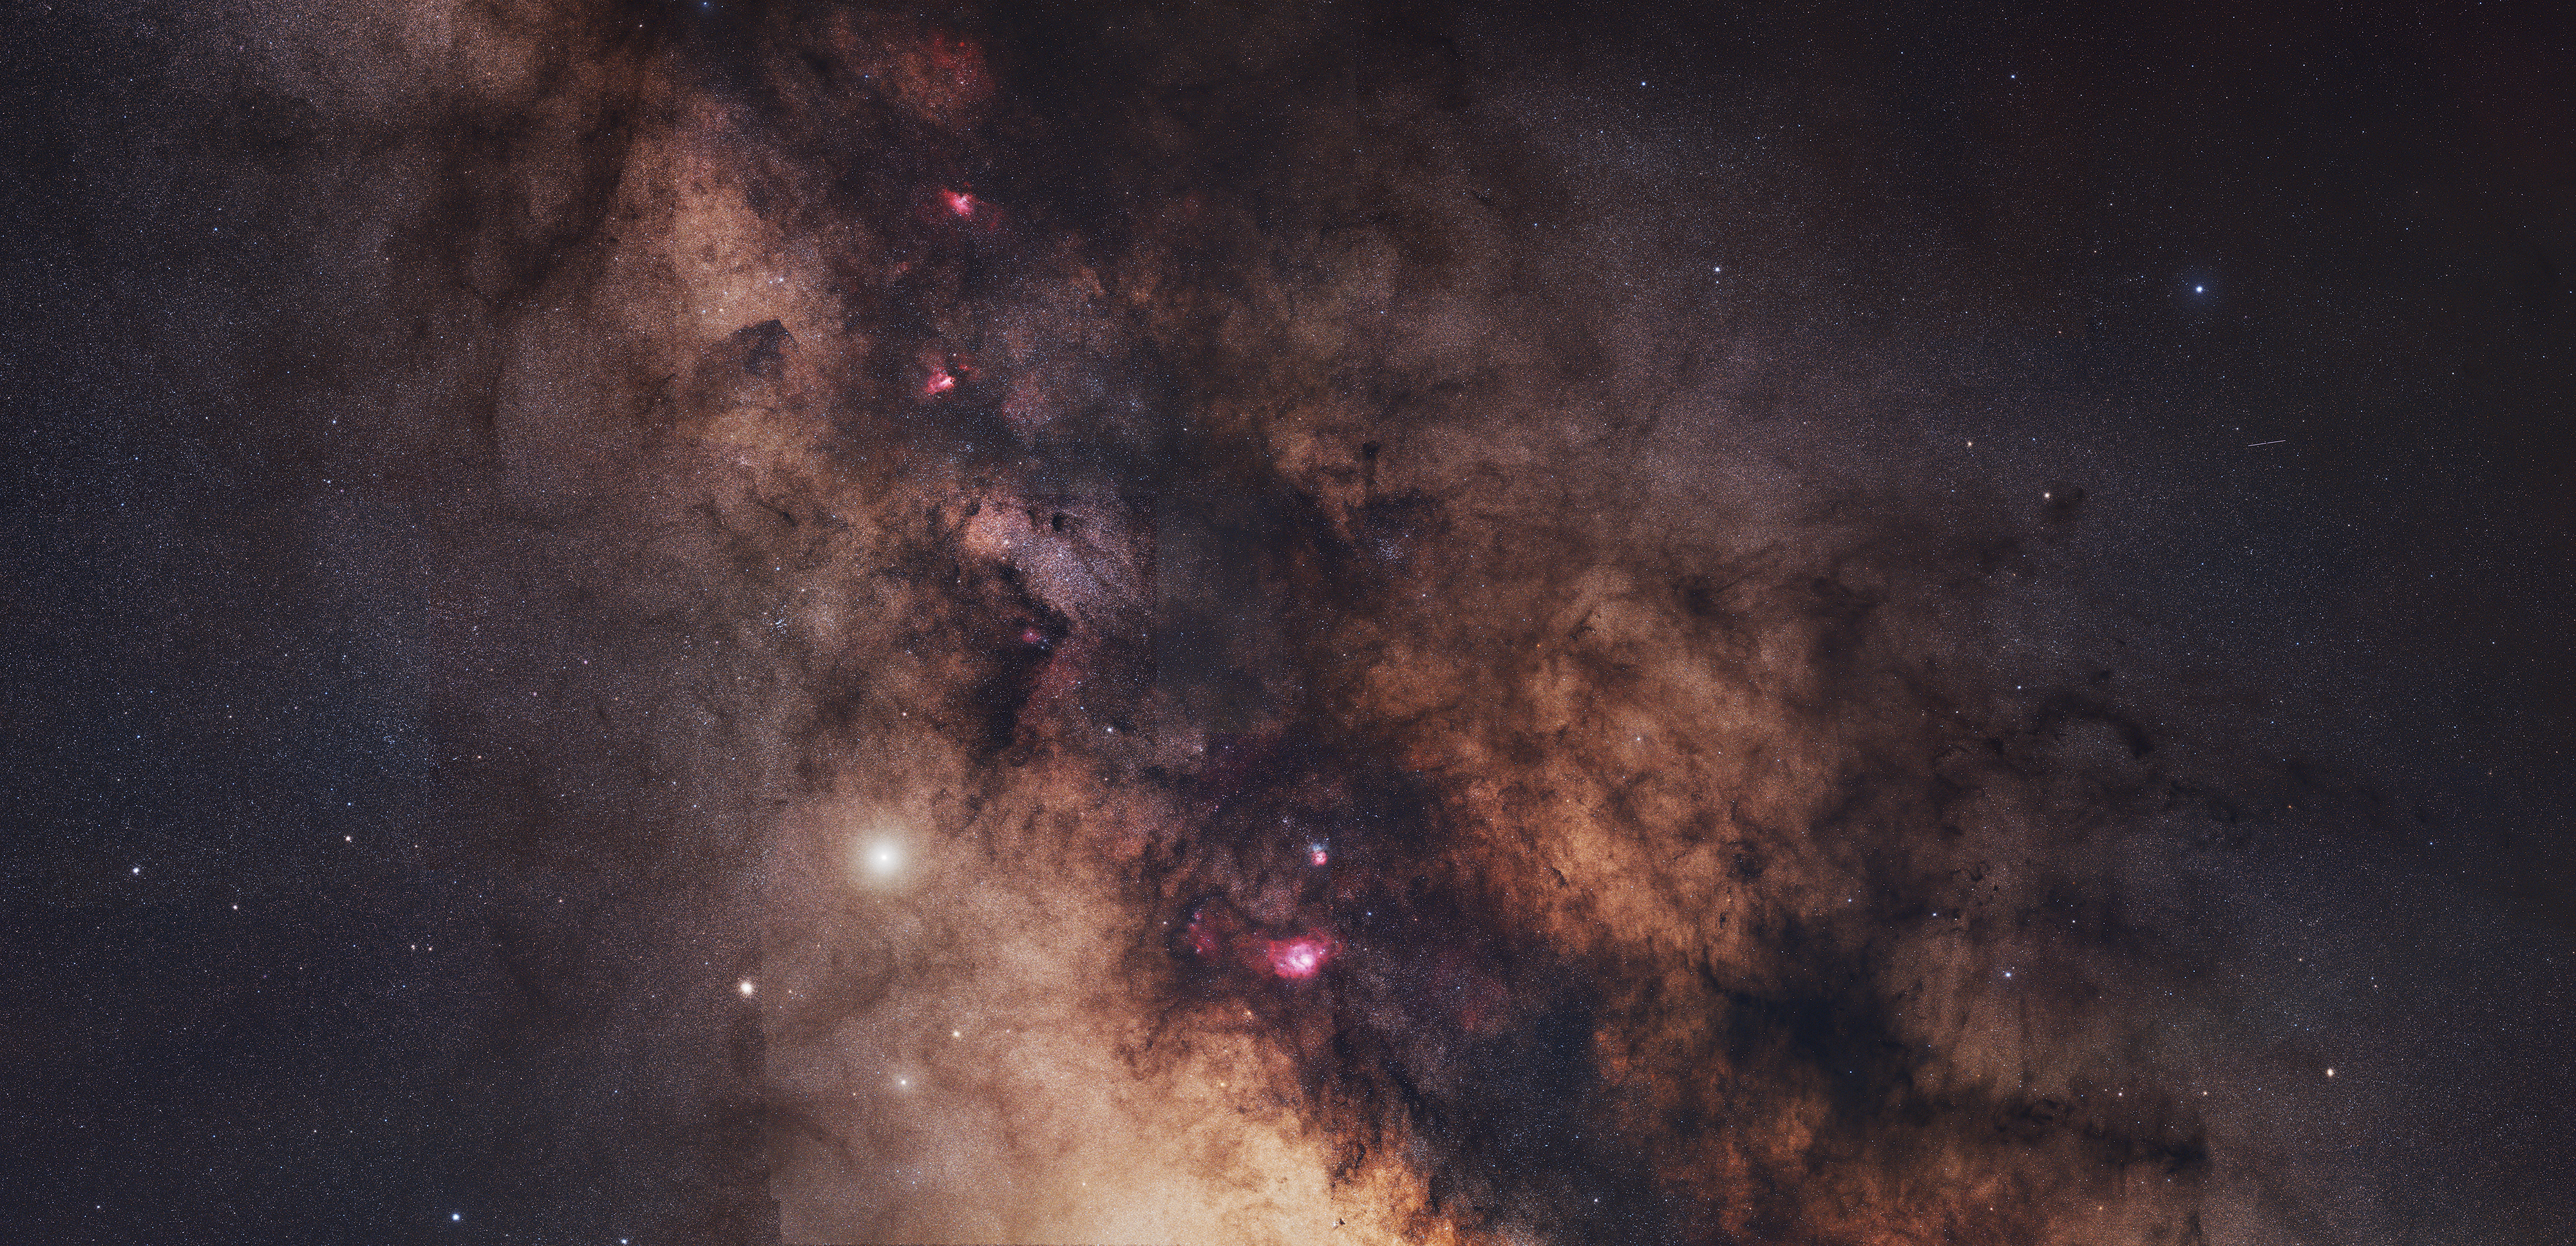
A mosaic of the center of our home galaxy using 14 panels with a Rokinon 135mm f2 lens and Nikon D5300 h-alpha modified.
Unfortunately, not a perfectly clear night, and so some panels had slight cloud cover, hence a difficult job in stitching together. But a very good practice for my first mosaic.
14 panels 2 subs x 1 min at f2 iso400 Rokinon 135mm F2 lens Nikon D5300 Advanced VX mount ST80/QHY5L-II Guiding
Calibrated in dss Stitched in msici Pixinsight: dbe, star masks, star reduction, lots of curves and histogram, remove green and thats it
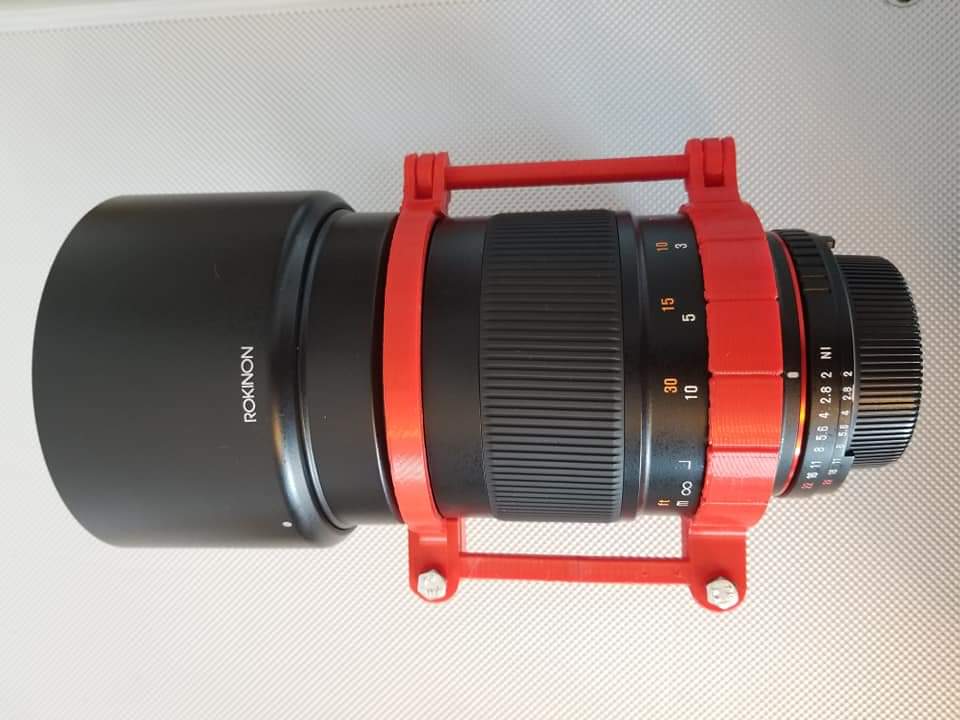
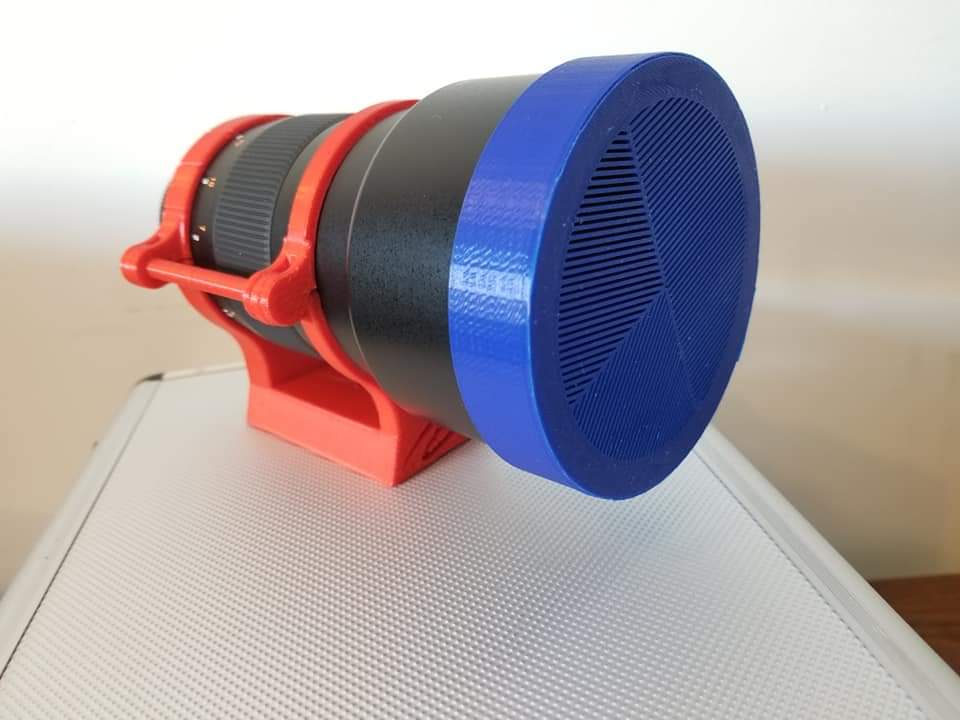
Recently I found out that a number of Toronto libraries have 3D printers available to the public. Printing there is extremely cheap. A fee of $0.10 per one gram of filament (printing material) is charged for each print job. Your only task is to find a model to print. Luckily, thingsverse.com is a website that has a huge catalog of 3D models available for download.
First and foremost, I needed a way to mount my Rokinon 135mm lens in a stable way. The lens weighs in at 816g and is imposible to attach to the mount without some rings supporting it.
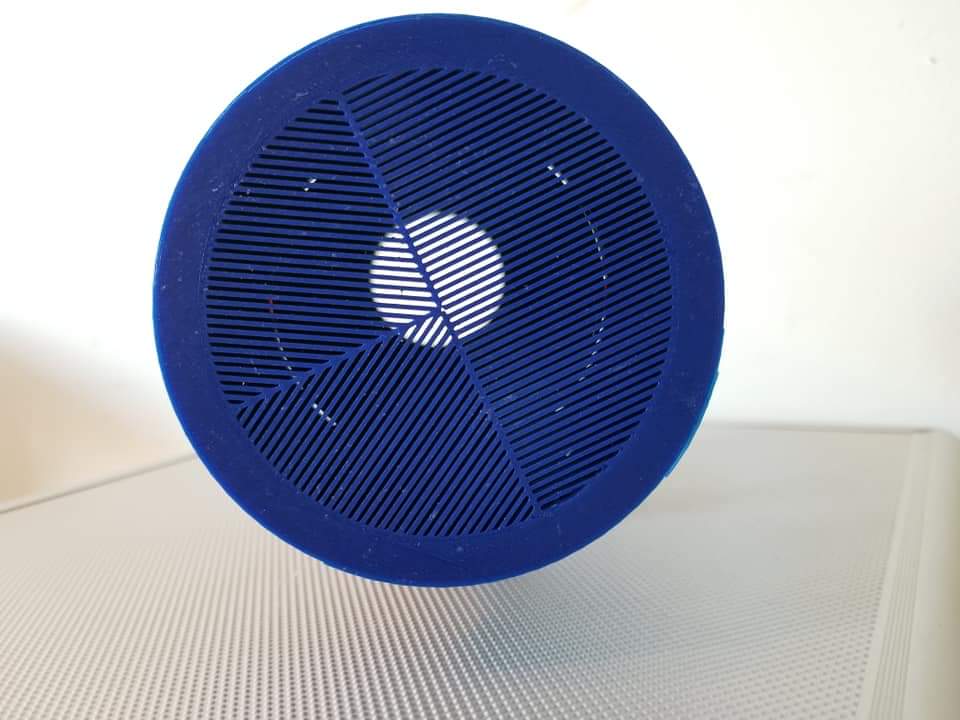
Searching thingsverse.com, I found a model designed specifically for the Rokinon 135mm f2. I also noticed a dedicated Bahtinov mask suited specifically for the hood size of the lens. After downloading both, I went to the library to make my first 3d prints.
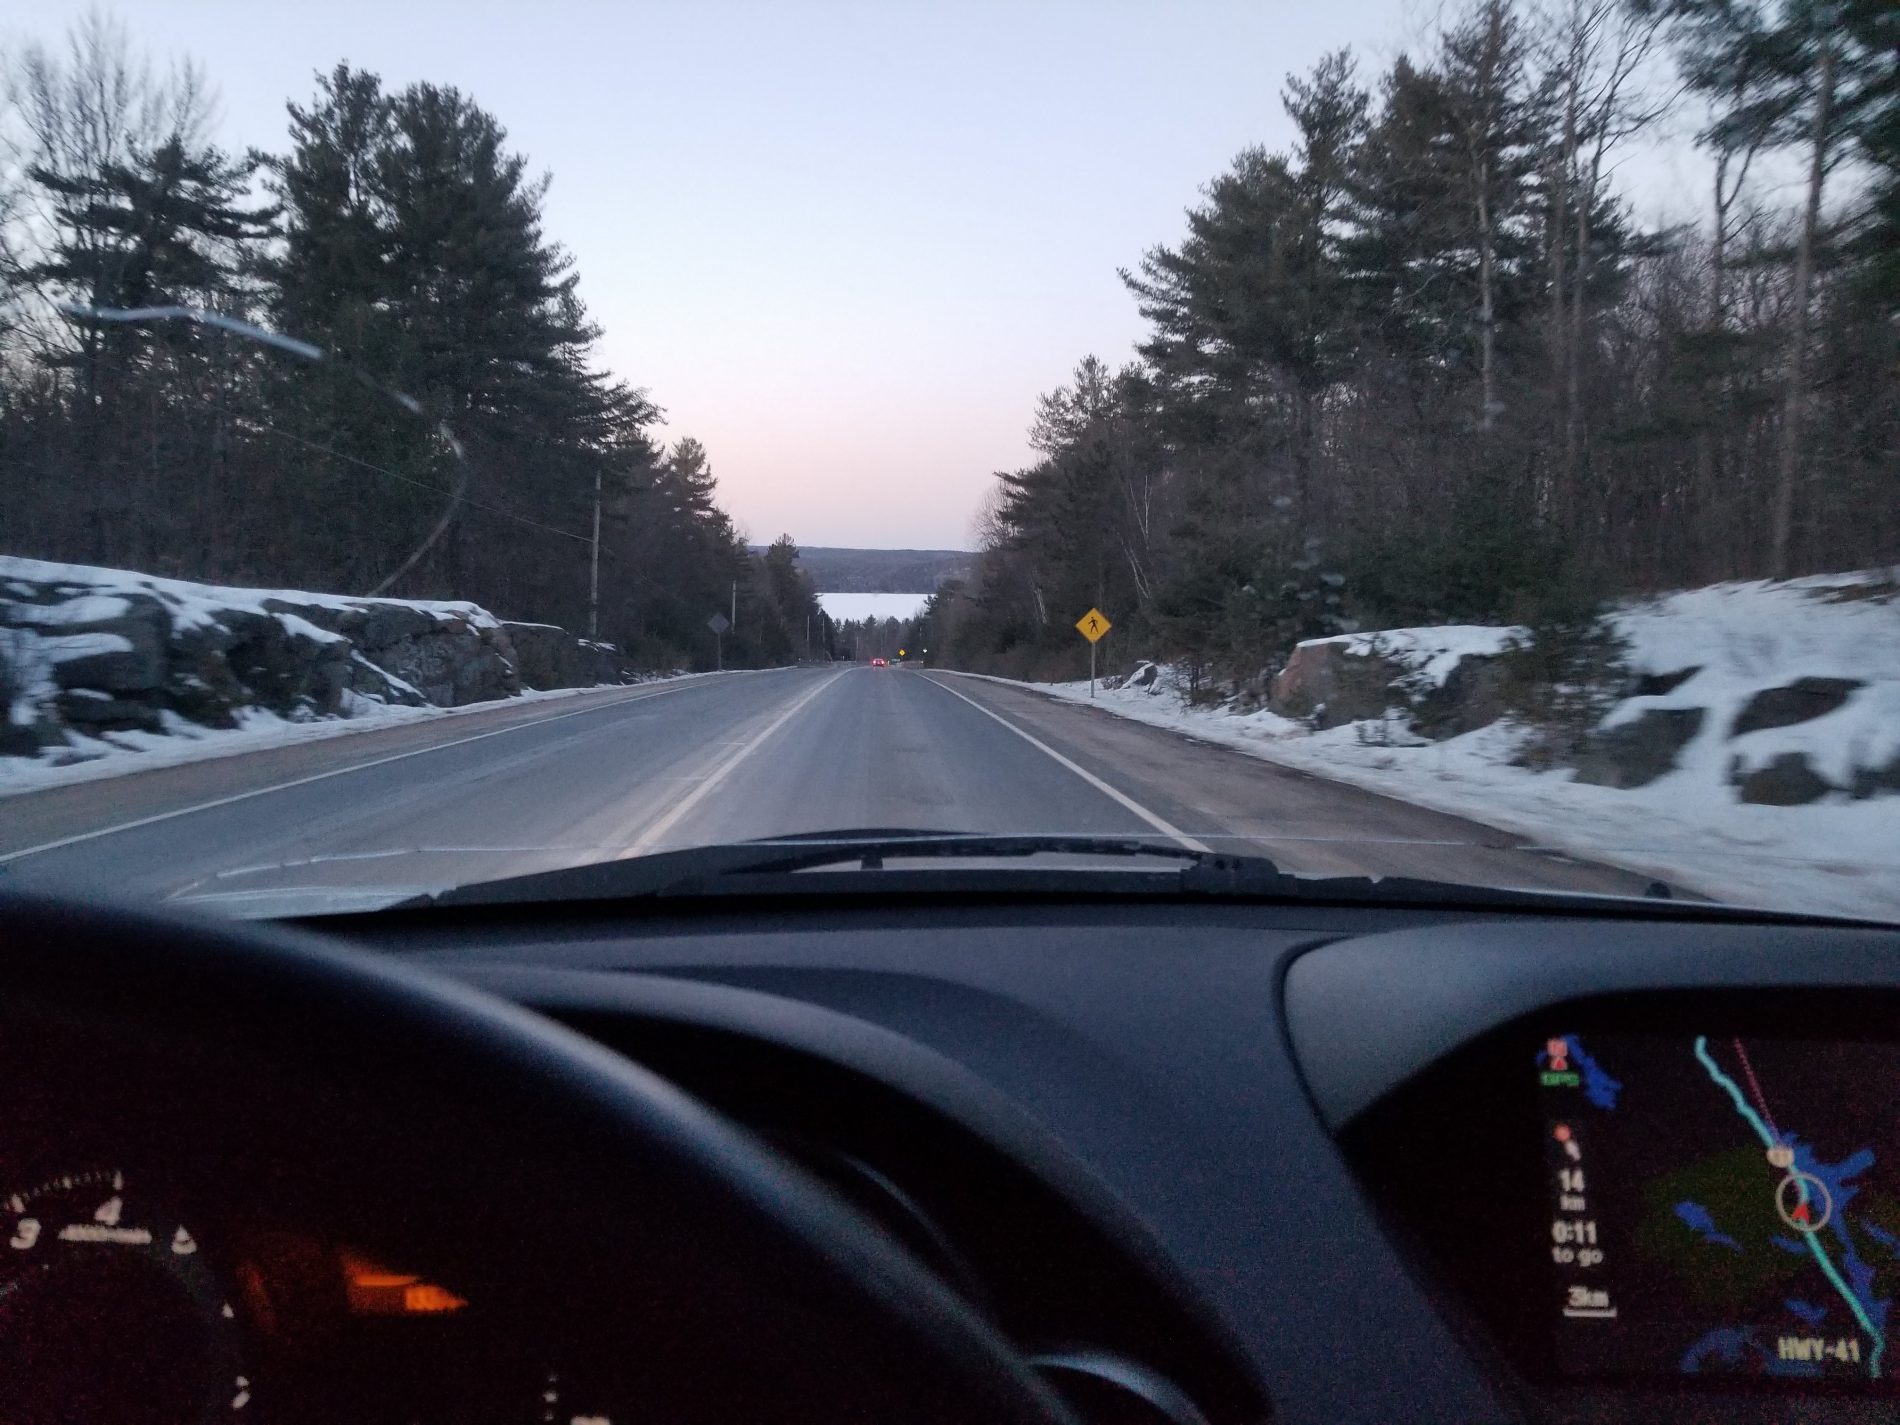
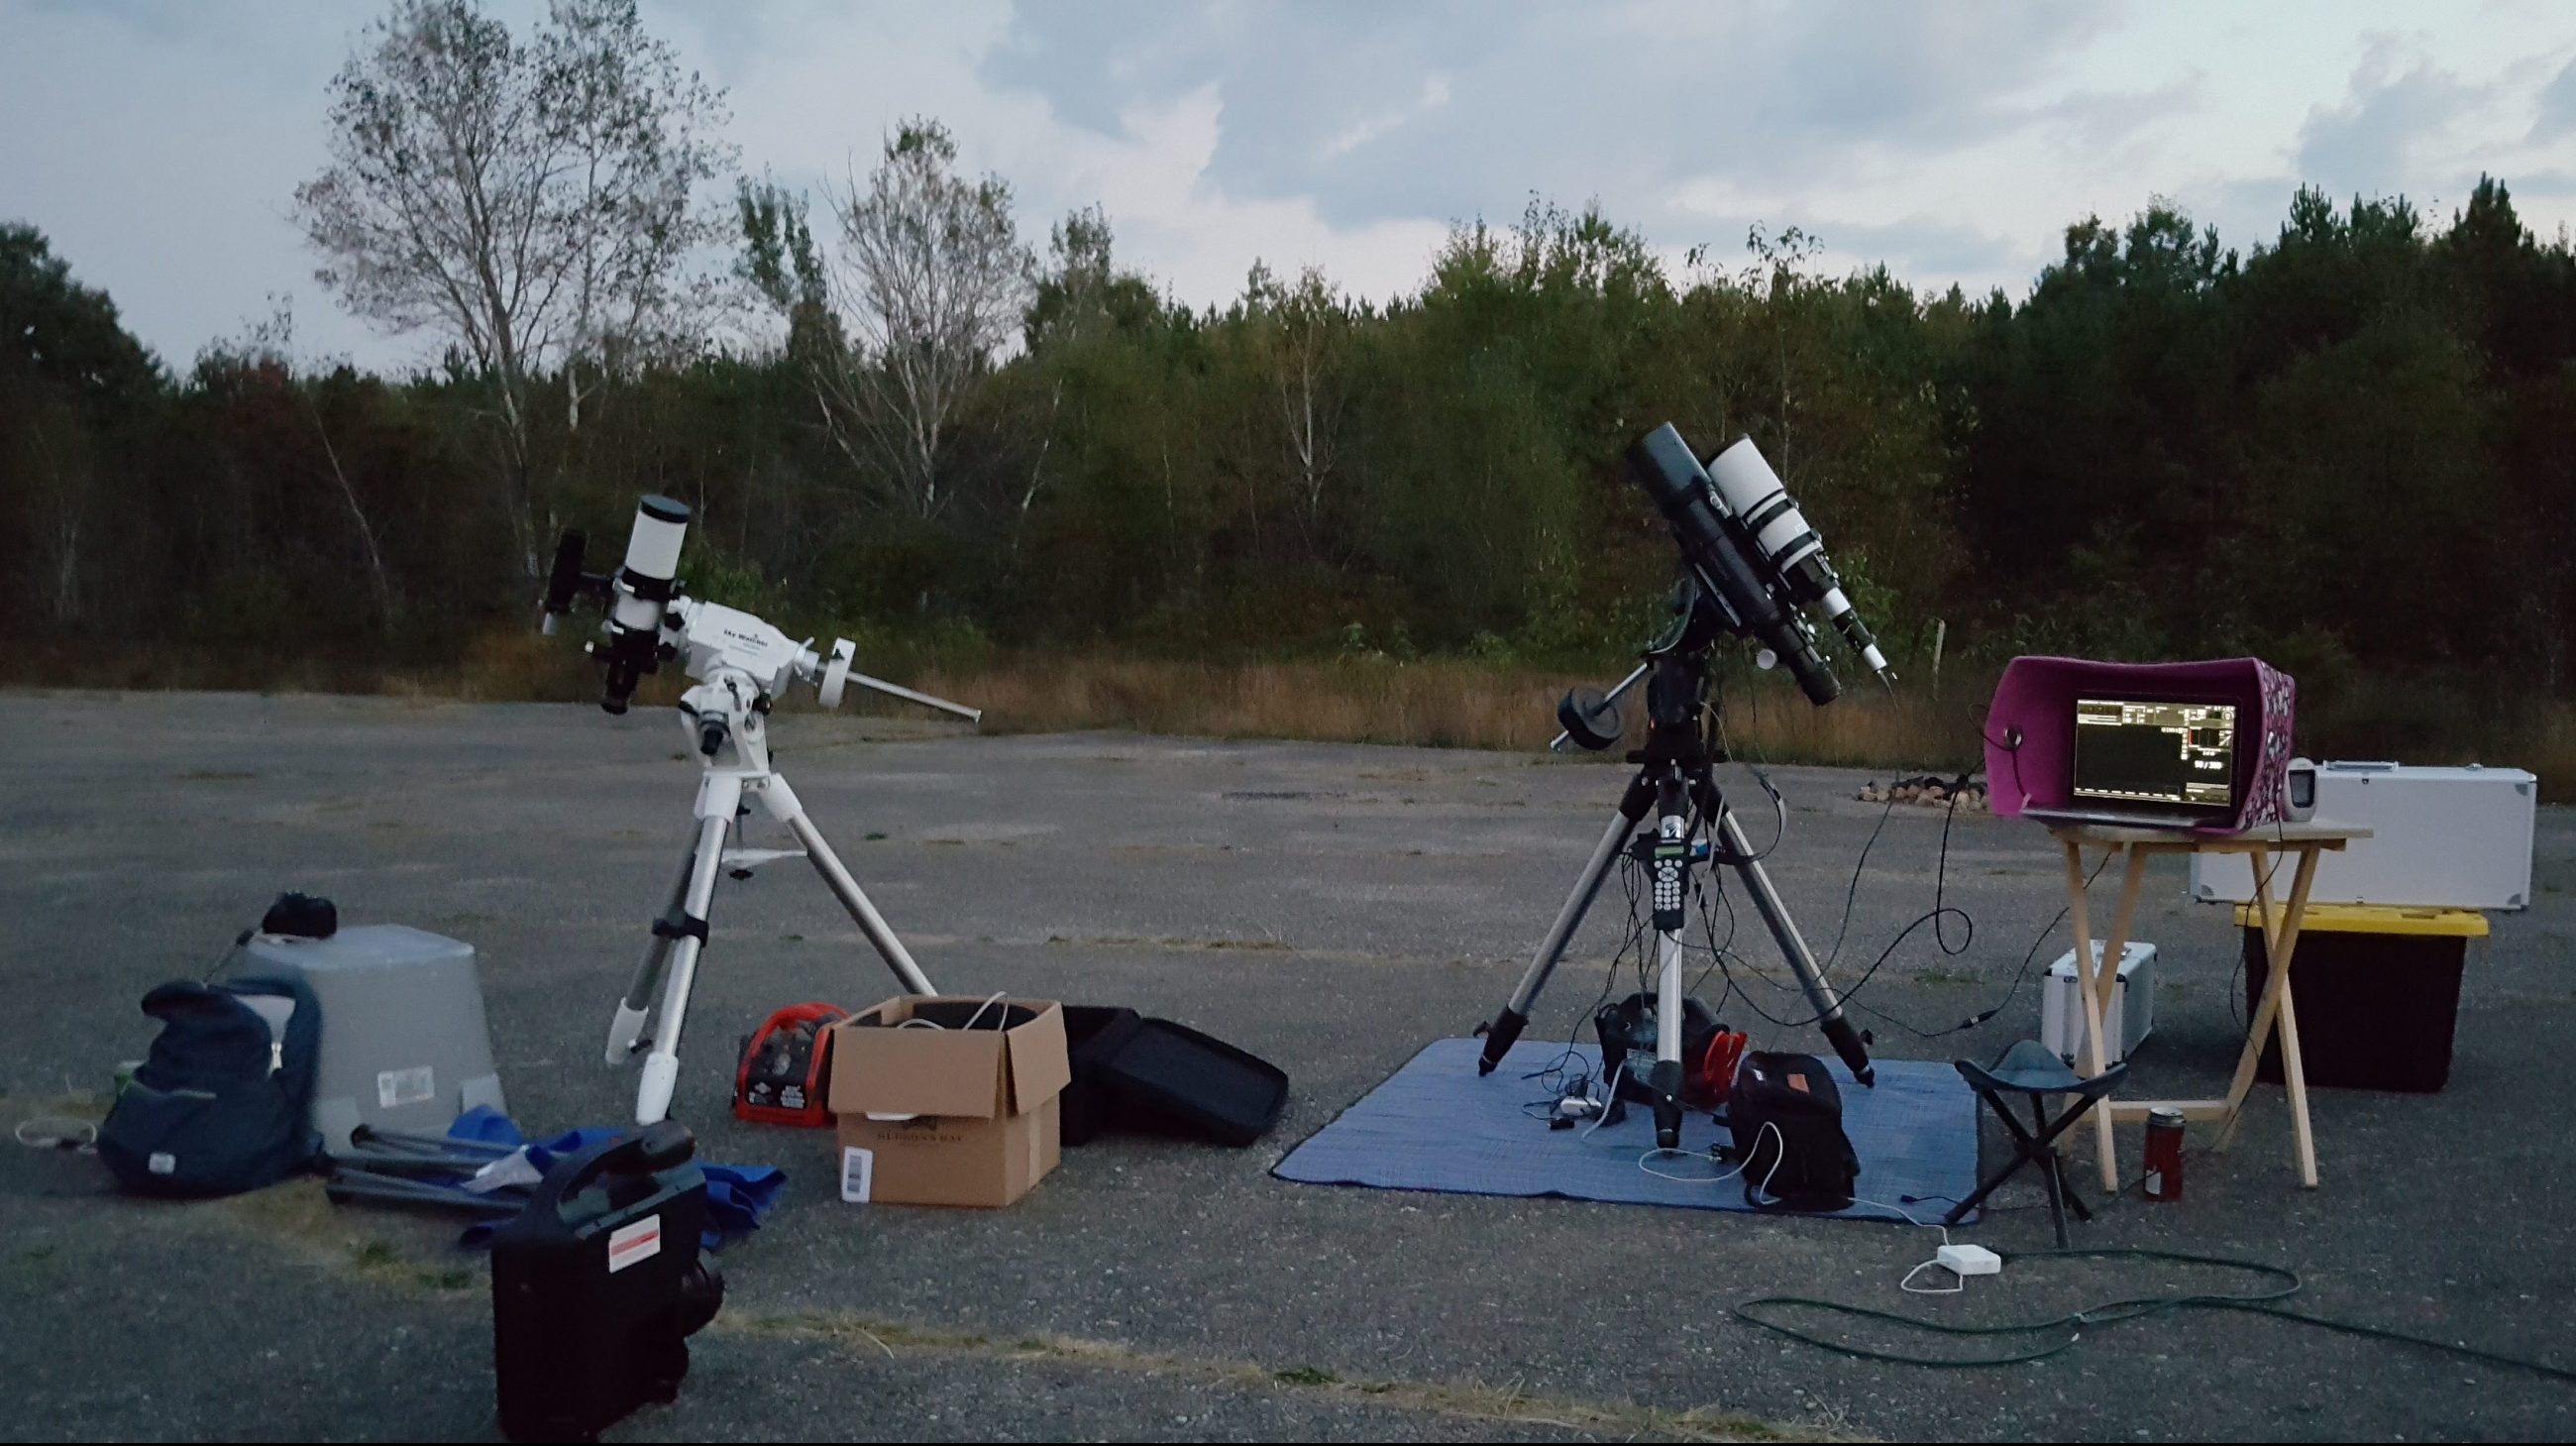
I set out on a trip to a Bortle 2 sky to Nirvana, north of Bon Echo Provincial park. As usually, I packed everything in my MDX, and set out early evening around 4pm. The trip is close to a 3 hour drive, in addition I also need a time buffer to setup which takes typically 90 minutes.
All gear packed and ready to go
Driving to past Bon Echo provincial park, the road turn very scenic, and my excitment is high. We are approaching one of the best astro sites in Southern Ontario. It lies evenly distant from light polluted urban metros of Toronto and Ottawa. Due to this, it is one of the most darkest, southern places you can visit.
Coming up to Mazinaw Lakes, in Bon Echo Provincial Park
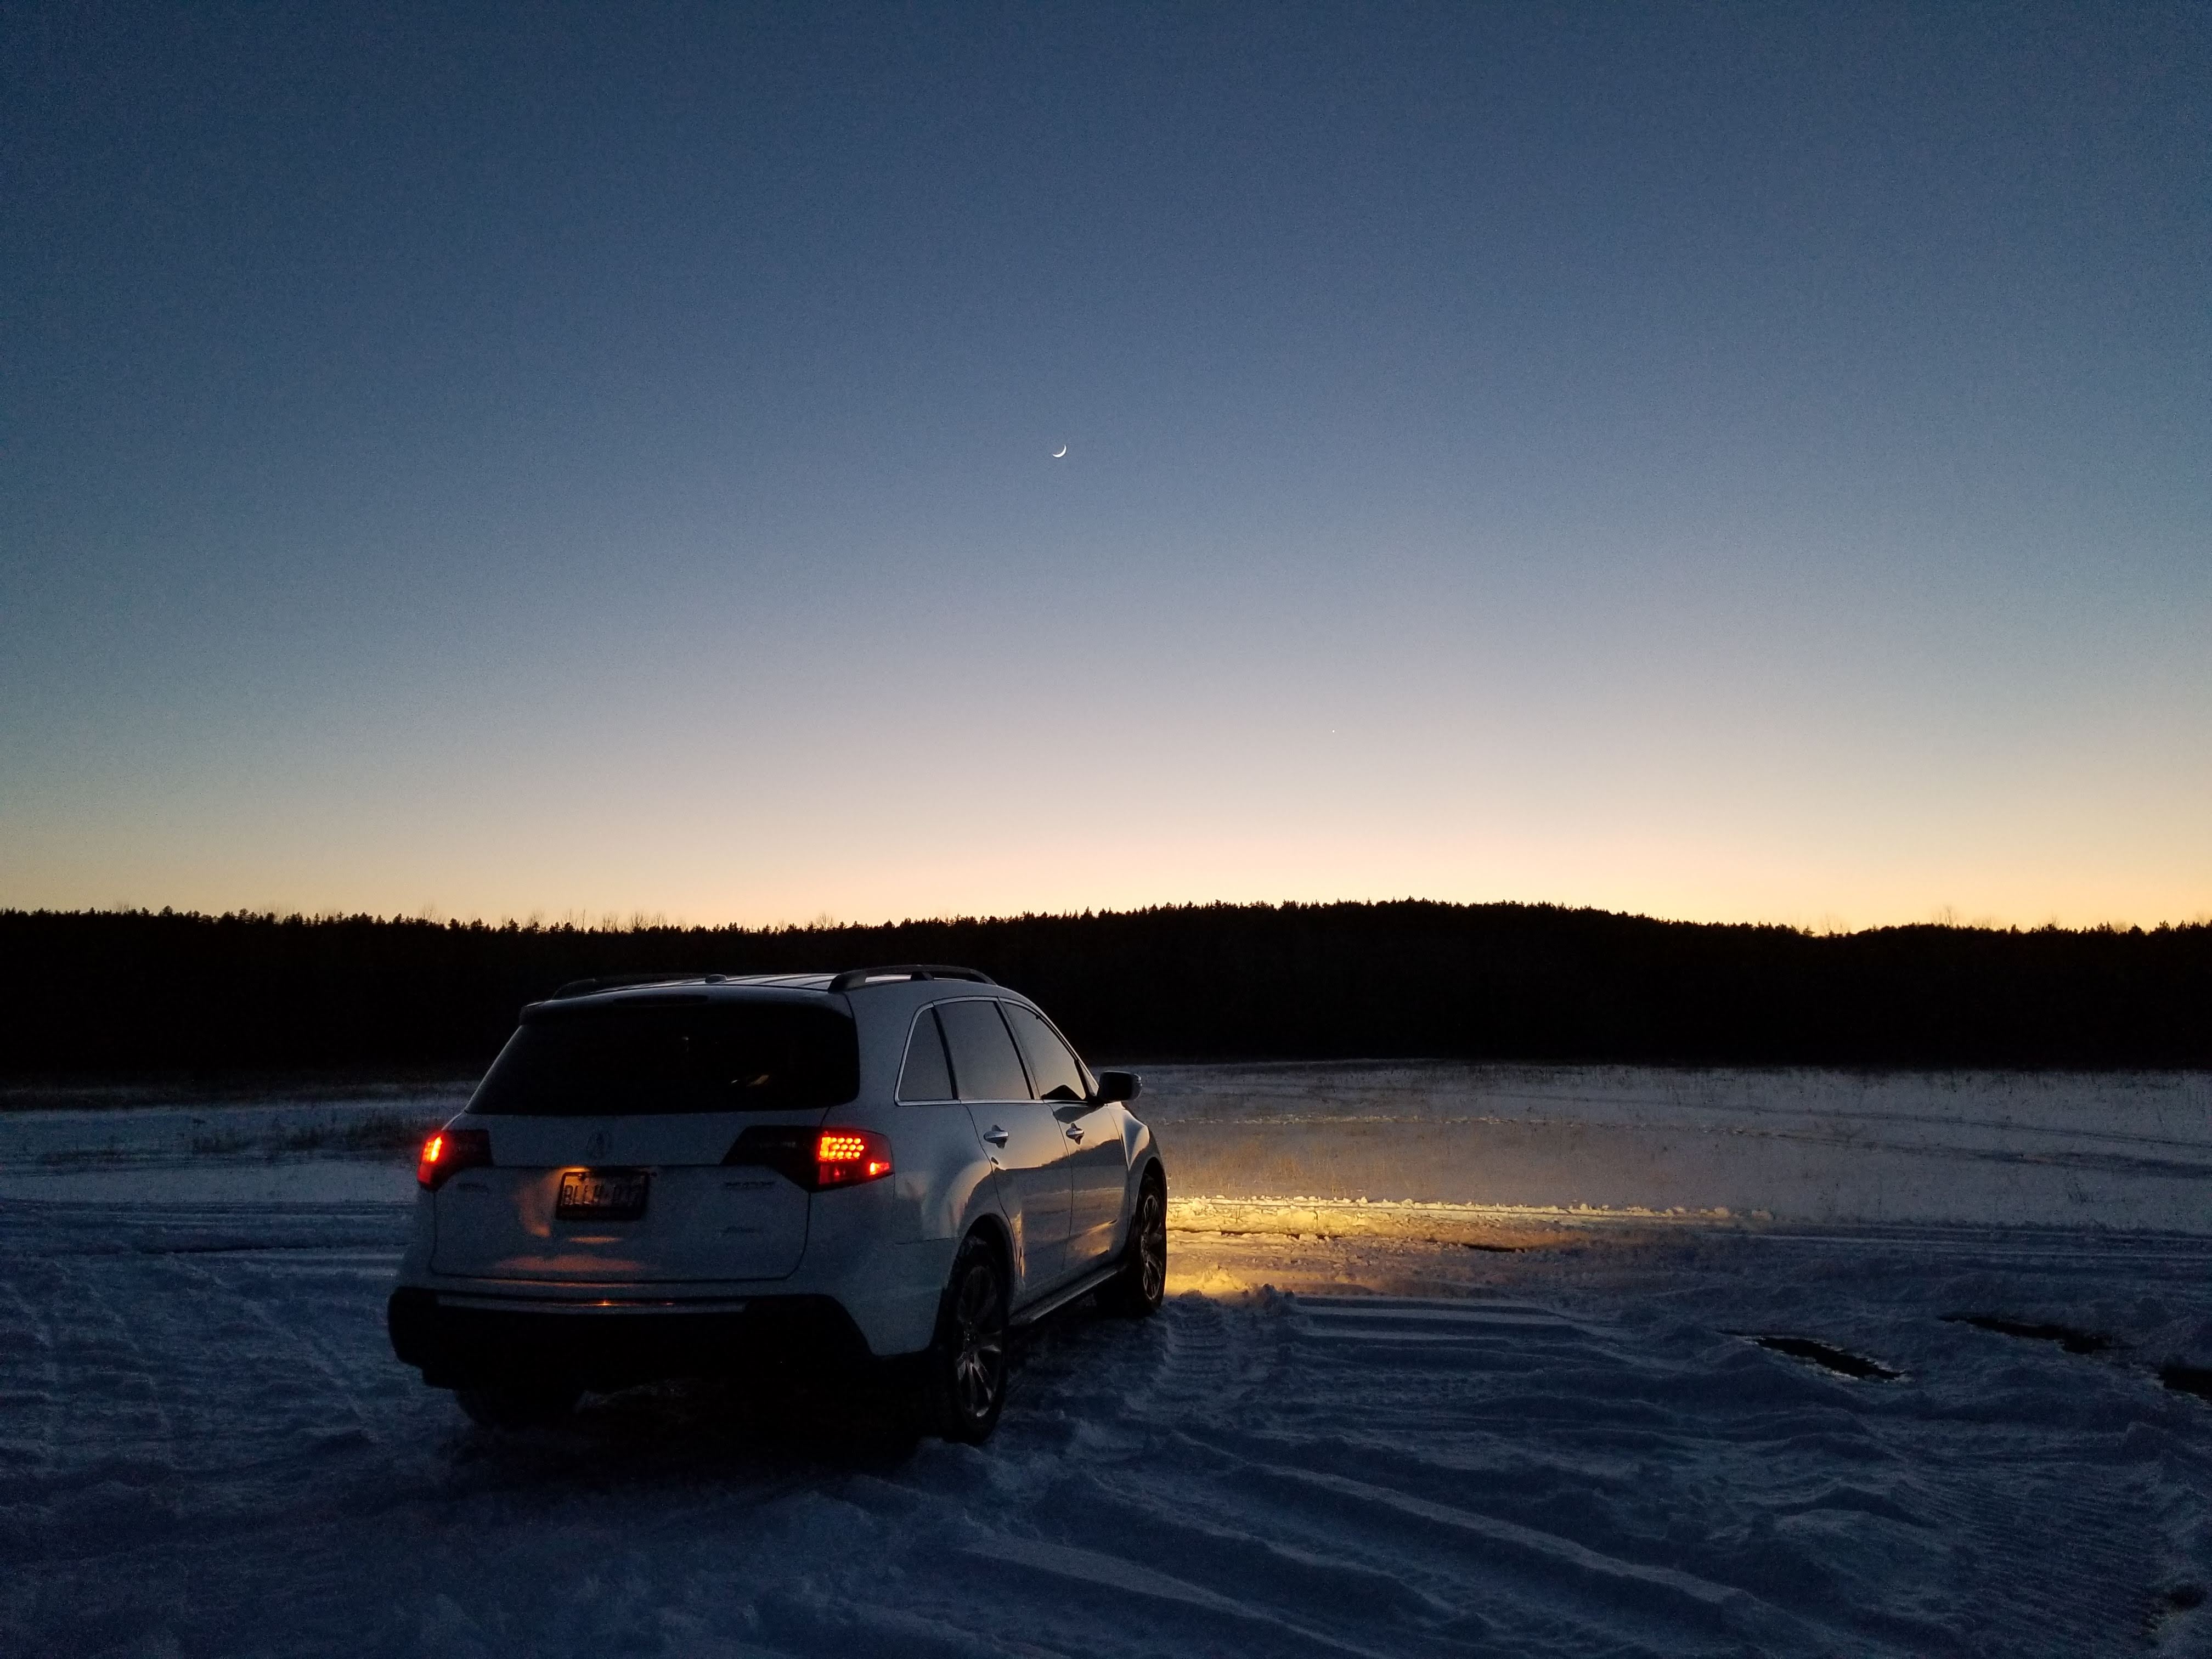
My biggest scare was 3 minutes from the site. After leaving the highway and turning deep into a forest track leading to my destination, I noticed that the trail was heavily covered in snow. We are deep in wild territory, and obviously there is no snow cleaning here. Everything was fine until I got to the final stretch of the path. To get to the abandoned airfield, you must get up a steep hill. In the summer this is effortless, but on a snow covered road, deep in a forest with ravines on either side of the road, this turned out to be very hard. No matter how hard I tried to get up, I ended up spinning my tires, and forced to back up down the hill. It was getting dark and hard to see, and I began to panick. I had to get my car up there, since I needed to use my car’s battery to power the rig as a backup power source. Luckily, after 25 tries, I managed to get up the hill by turning off traction control. When I arrived at the top, I was rewarded with the following view:
Nirvana aka Irvine Lake landing strip – Bortle 2 location
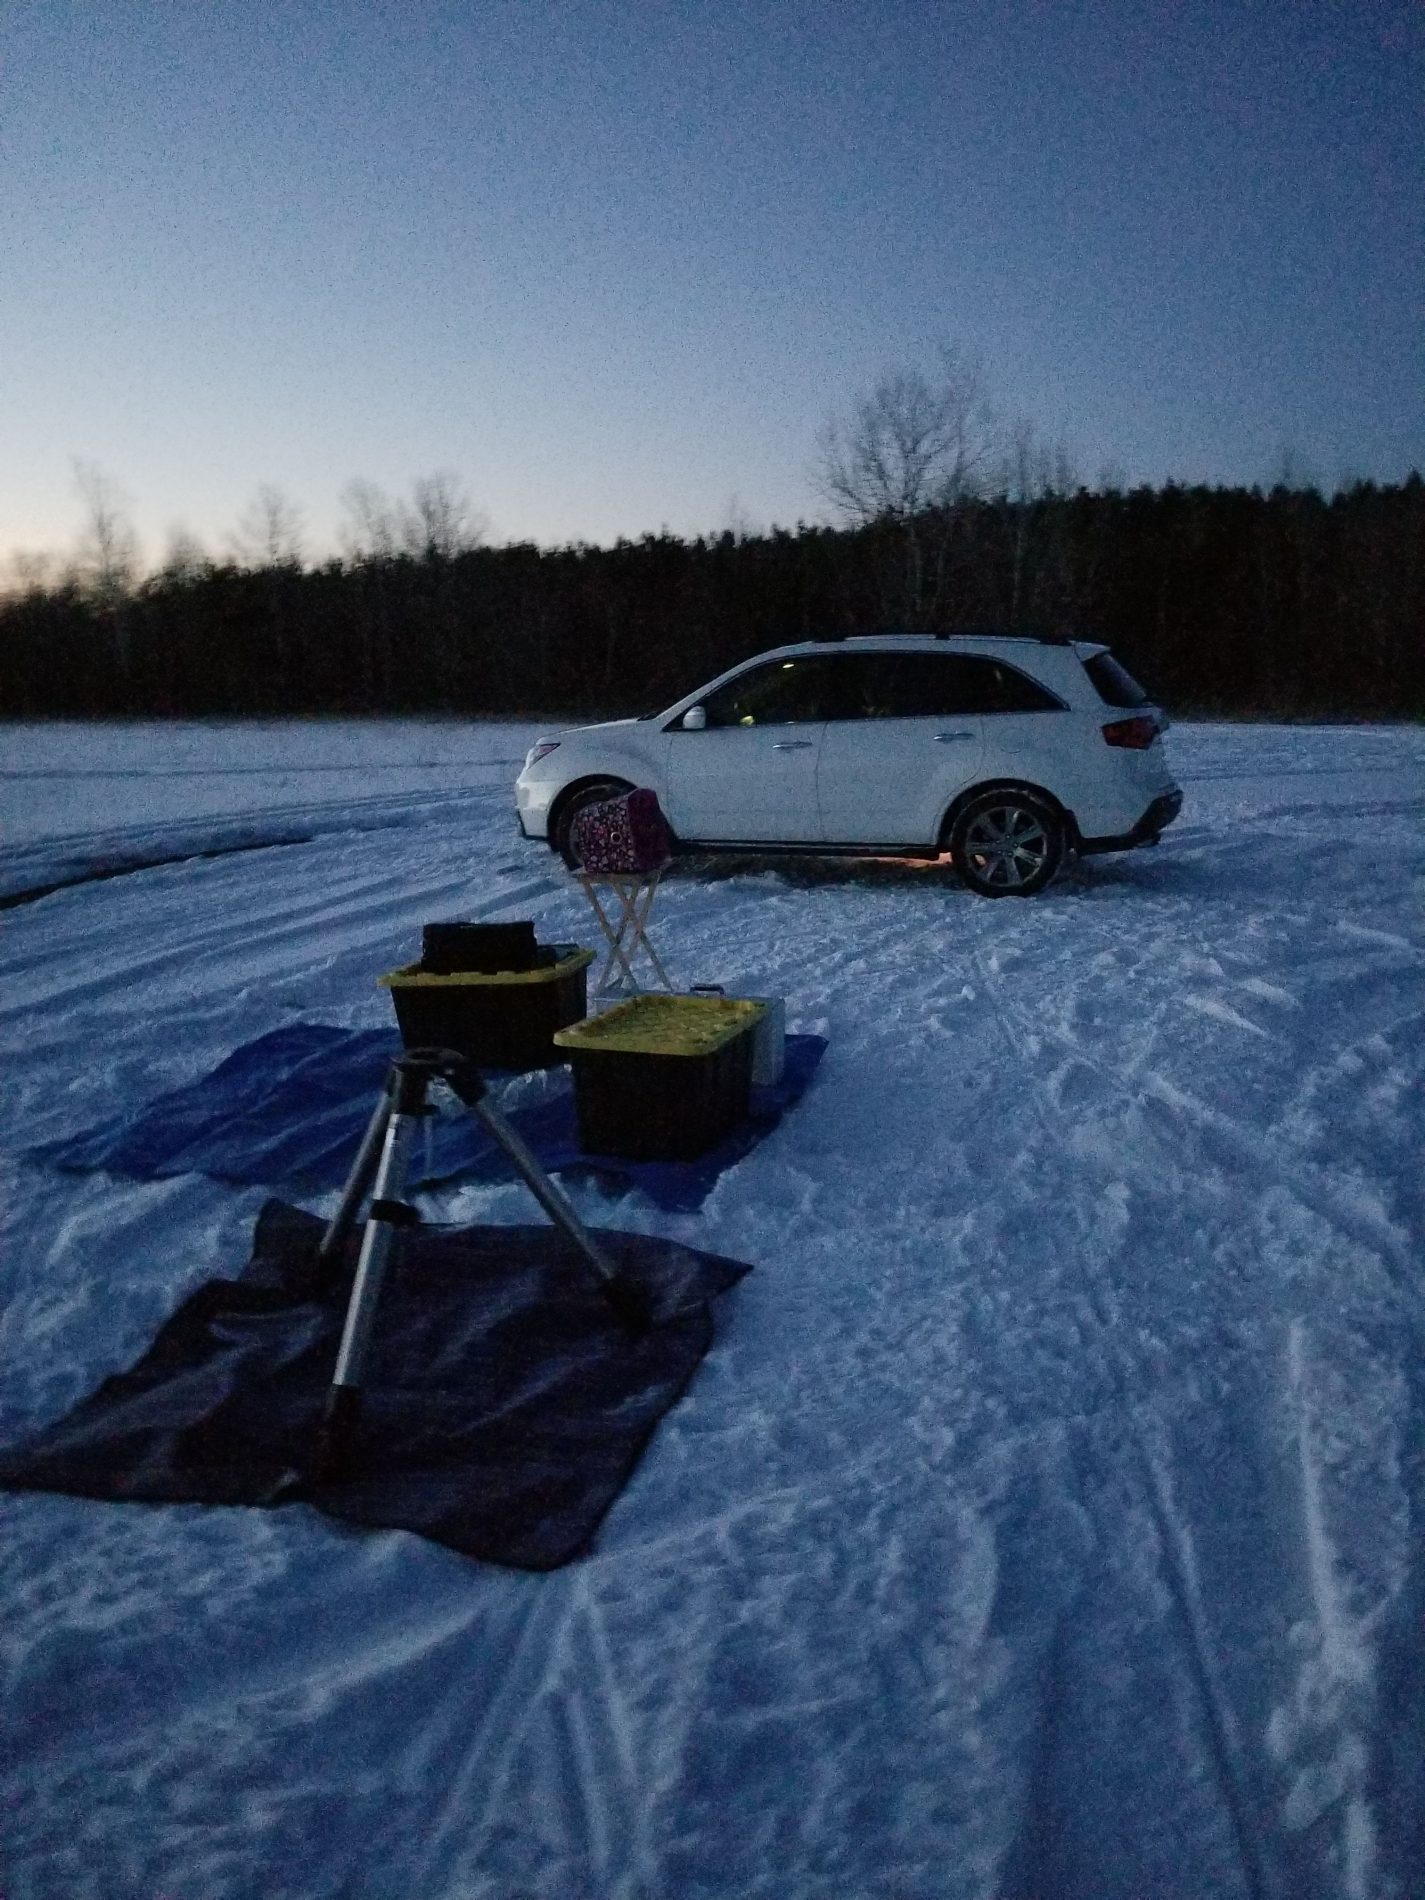
All that was left was to setup. Even though it was cold, my excitment was keeping me warm. Ahead was a photo that I’ve been dreaming about a long time.
Getting ready to setup
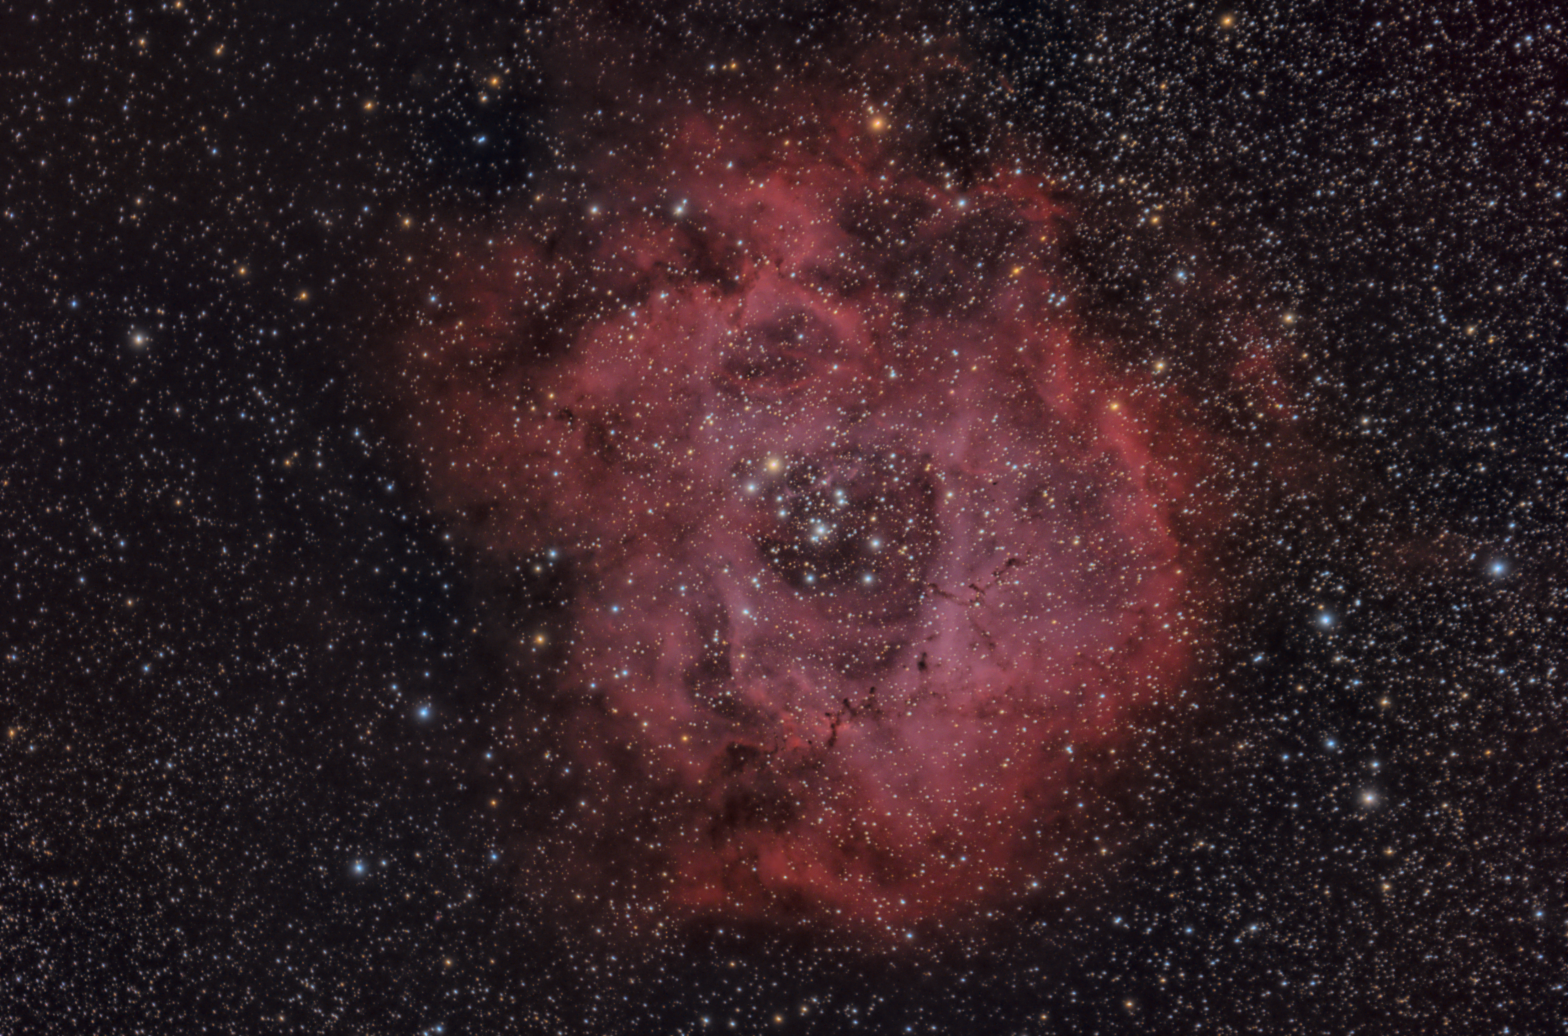
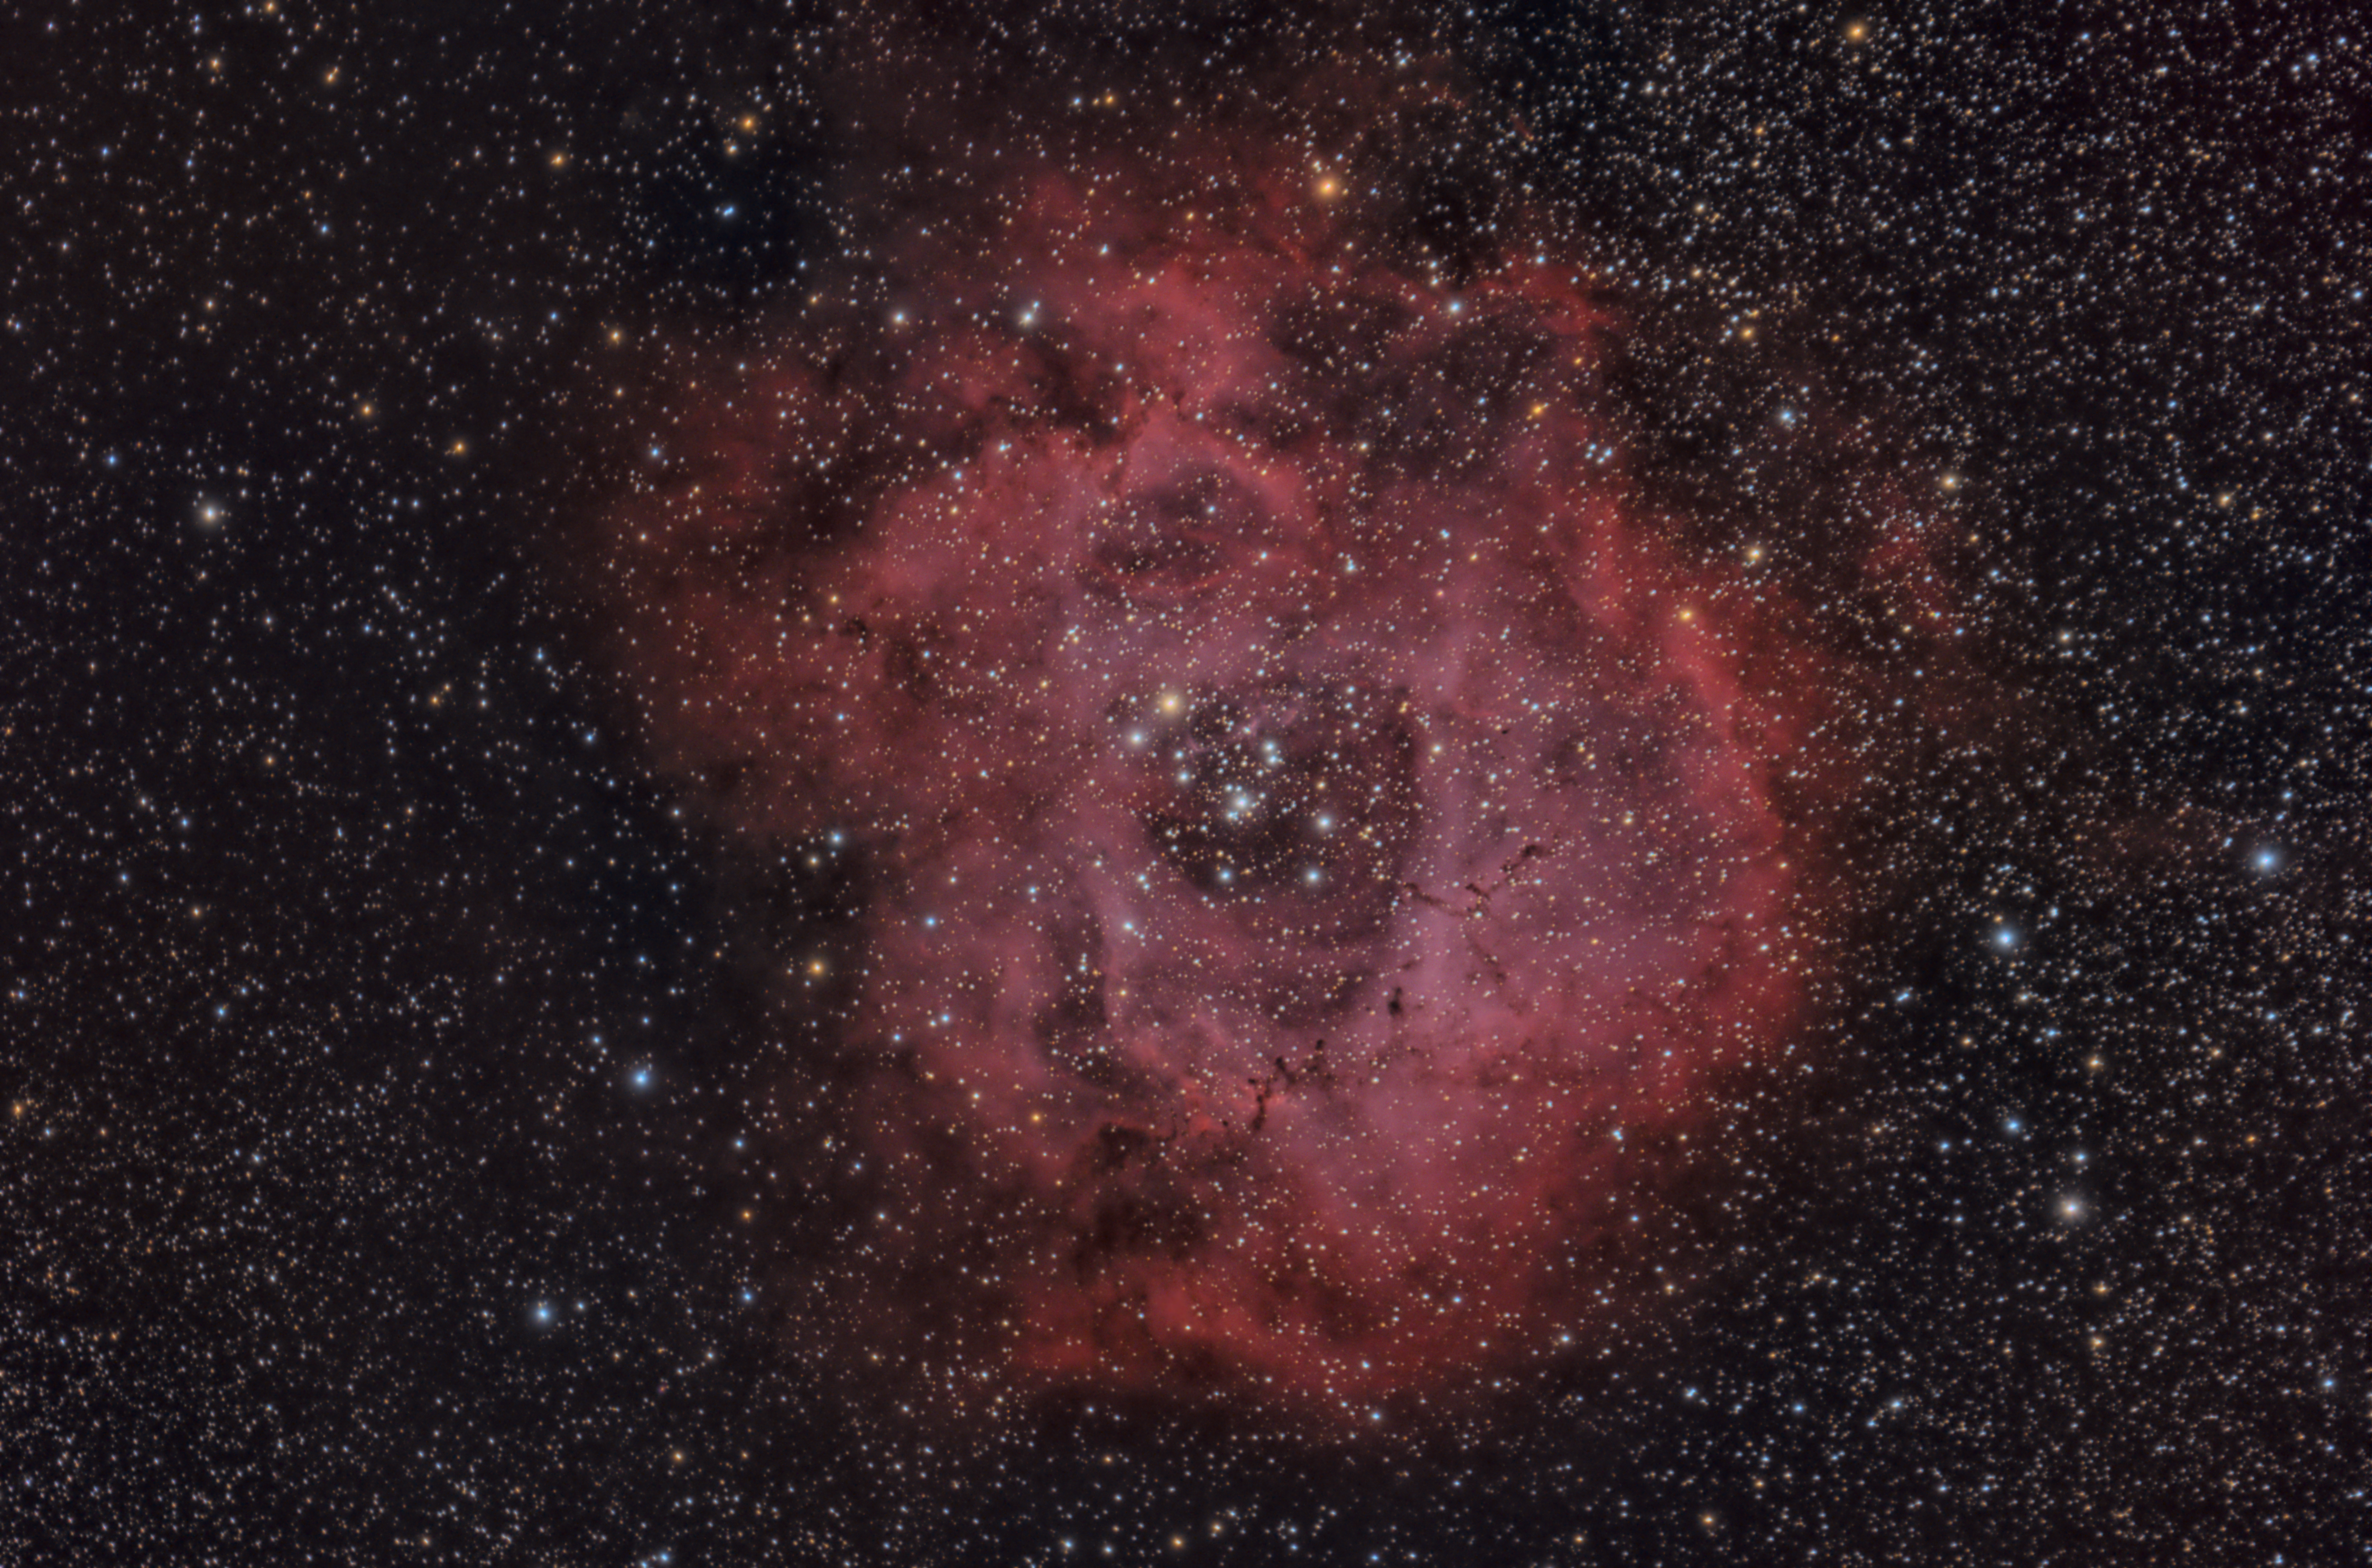
The Rosettte Nebula is a nebula that looks like a beautifull flower. It has strong Oiii signal in the center which makes it look colorful and dynamic.
In the end though, I struggled with my guiding. A combination of the objects location and average seeing conditions probably affected my ability to guide below my recommended RMS of 1.58″. My PHD graph was showing horrible RMS values – around 1.2 for DEC and 1.6 for RA. This prevented me from having pin point stars that in turn produce a sharp looking image.
C49 – The Rosette Nebula
Orion ED80 with x0.85 reducer and GSO focuser Advanced VX mount Nikon D5300 h-alpha modded ST80 with QHY5L-II for phd guiding Sharpcap polar alignment
12 dithered subs @ 200 iso x 480s = 1h 36min total 30 bias 30 flats
Imaged using BackyardNikon, Stacked in DSS, processing in Pixinsight.
Dynamic crop (just edges) DBE Background Neutralization Color Calibration SCNR Green Luminence mask MLT noise reduction on background Histrogram transformation Mask with stars mask subtracted for:LocalHistogramEq Histogram adjustment MLT Chrominance Color saturation adjustment Curves adjustment Morphological transformation for star reduction Dark structure enhance
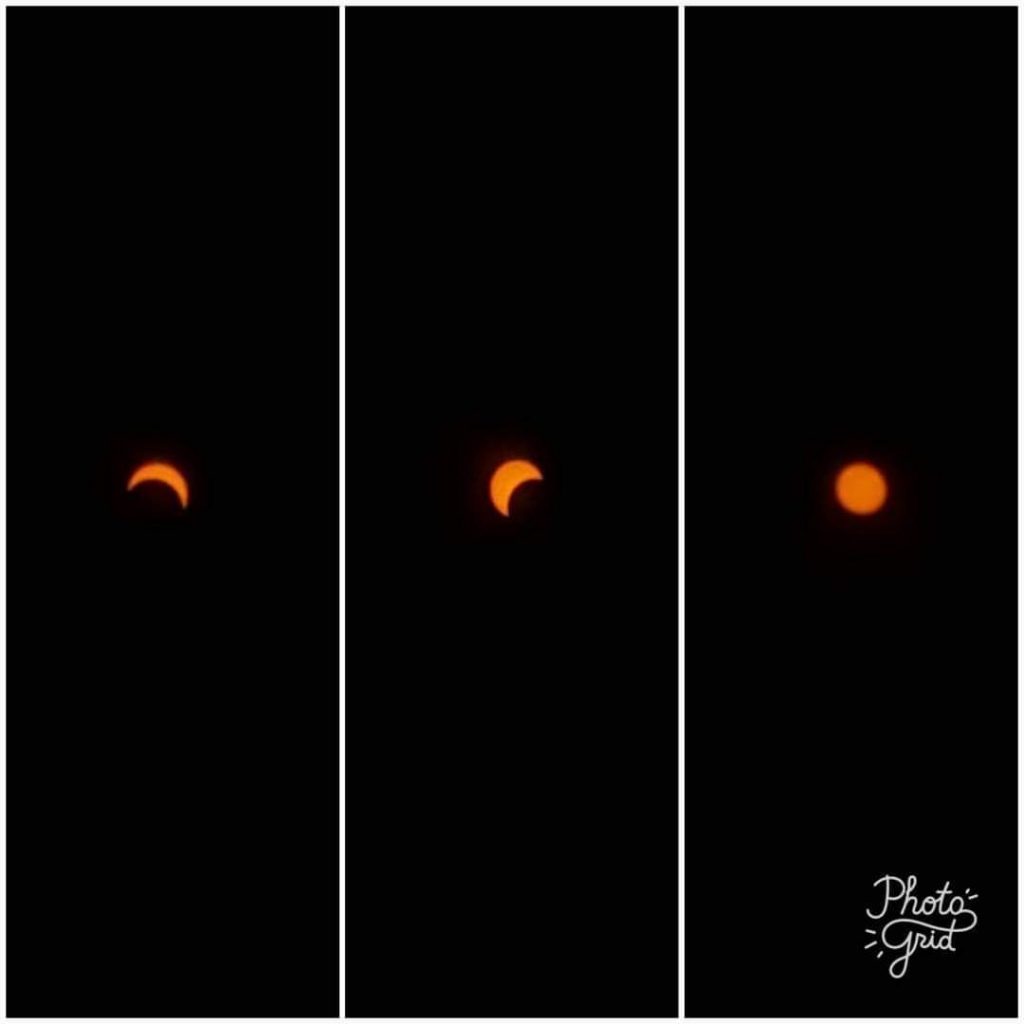
My coworker brought solar glasses today. So I did what any astrophotographer would – I took my trusty Samsung Note 5 and shot the solar eclipse through them. 10 years ago this would have been impossible, but now even a cell phone can produce simple but clear images such as this:
No need for fancy gear, just my trusty mobile samsung note 5.